How to crochet a Diplodocus dinosaur amigurumi — your beginner-friendly PDF guide
This long-necked beauty is simpler than you think. Follow along and you'll have a squishy Diplodocus to love (or gift) by the weekend.


A peek at what you can make
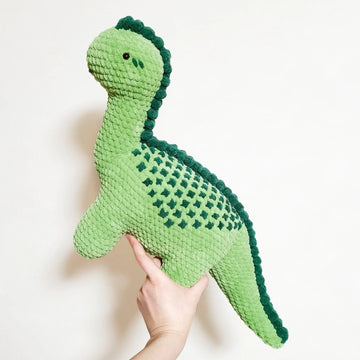
The Diplodocus is one of the most instantly recognisable dinosaurs ever — that impossibly long neck, the tiny head, the graceful sweeping tail. And it turns out those same features that make it iconic in museums make it an absolute joy to recreate in yarn. Each section of the body is crocheted separately in the round, so even if you've only made a couple of amigurumi before, you'll find a clear rhythm here.
What you need before you start
Gather your materials so nothing interrupts your flow once you cast on.
You'll need worsted-weight yarn in your chosen dino colour (a muted sage, warm grey, or classic green all look fantastic), a 3.5 mm or 4.0 mm crochet hook, polyester fibrefill stuffing, two 9 mm or 12 mm safety eyes, a tapestry needle, and stitch markers. If you're making this for a child under three, skip the safety eyes and embroider the eyes in black yarn instead — safety first always.
Wondering which yarn performs best for amigurumi? Head over to our guide on the best yarn for amigurumi — we break down cotton versus acrylic so you can pick the right fibre for your project. For most Diplodocus patterns a smooth, pill-resistant acrylic gives the cleanest stitch definition.
Understanding the pattern before you crochet a single stitch
Amigurumi patterns use a shorthand that can look intimidating at first glance. Terms like sc (single crochet), inc (increase — two sc in one stitch), and dec (invisible decrease) repeat throughout the Diplodocus pattern. If any of those feel unfamiliar, our full guide to reading amigurumi patterns walks you through every abbreviation with photos.
Most Diplodocus patterns are worked in a continuous spiral rather than joined rounds, which means you never slip-stitch to close at the end of a row. Keep a stitch marker in your first stitch of each round so you always know where you are — it's the single most important habit for tidy amigurumi.
Starting with a magic ring
Almost every piece of this pattern begins with a magic ring. Pull the ring tight before you begin your first round increases — a firm, gap-free centre makes the finished piece look polished and professional. If magic rings give you trouble, our article on magic ring alternatives offers a simple chain-2 substitute that works just as well.
"The moment you sew that long neck onto the body and it curves just so — that's the magic of amigurumi. A few rounds of yarn suddenly becomes a 150-million-year-old dinosaur."— Ava, MrsCrochetWorld
Dinosaur patterns to add to your collection
Once you've mastered the Diplodocus, these patterns are the perfect next steps — or grab the bundle and save.
4-in-1 Dinosaur Crochet Bundle
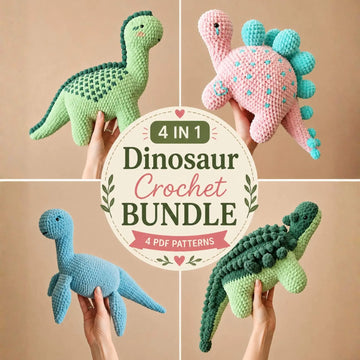
Best valueFour dino patterns in one download — T-Rex, Stegosaurus, Triceratops, and Brachiosaurus. Perfect for anyone who catches dinosaur fever after finishing the Diplodocus. See how they compare in our beginner amigurumi roundup.
Stegosaurus Crochet Pattern — Low-Sew
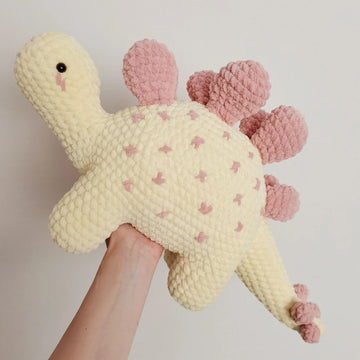
Beginner-friendlyThe low-sew construction means the spiky back plates are far easier to attach than they look. A great confidence-builder after the Diplodocus neck assembly. Explore more amigurumi patterns in the collection.
T-Rex Dinosaur Amigurumi Pattern
Fan favouriteTiny arms, big personality. The T-Rex is the crowd-pleaser of the dino family and uses many of the same techniques you practised on the Diplodocus. Check our full guide on sewing amigurumi parts together before tackling those little arms.
Six things that make a Diplodocus amigurumi truly special
Small details that take your finished dinosaur from "cute" to "wow, you made that?"
Stuff the neck firmly
A well-stuffed neck holds its graceful curve. Add fibrefill gradually as you crochet upward rather than stuffing all at once at the end — you'll get a much better shape.
Choose a two-tone colour scheme
Real Diplodocus colouring is unknown, so let your imagination run wild. A darker spine with a lighter belly reads as realistic and requires only one clean colour change.
Place the eyes before closing the head
Insert your safety eyes while the head is still open and easy to adjust. Position them slightly forward on the head for that endearing, dopey dinosaur expression everyone loves.
Pin before sewing
Pin the neck, legs, and tail in place with sewing pins and step back to check the posture before sewing anything permanently. A few minutes here prevents a lopsided dino.
Use the yarn tail to sew
Leave a long yarn tail when fastening off each piece and use it to sew the parts together. This invisible join technique is covered in detail in our mattress vs whipstitch guide.
Ready for more?
Once you've mastered the Diplodocus, our complete beginner guide to crochet maps out every next skill — from tension control to reading complex charts.
Pro tips for a flawless finish
- Count every round. Amigurumi shapes rely on precise stitch counts. A missed increase early in the body creates a ripple effect through every subsequent round — use a counter app or tally marks on paper.
- Work tightly. A tight gauge hides the stuffing inside and gives crisp, defined stitches. If you can see fibrefill peeking through, go down half a hook size. Our tension guide explains exactly how to adjust.
- Close the tail gap cleanly. The Diplodocus tail narrows to a point. After your final decrease, thread the yarn tail through the remaining stitches with a tapestry needle and pull snug — no gap, no stuffing escaping.
- Block the finished piece lightly. A light steam over the completed dinosaur with a hand-held steamer (never iron directly) relaxes the fibres and evens out any uneven tension spots.
- Keep a project photo. Snap a picture before you stuff and close each section. If something looks off during assembly you'll have a reference to spot where the shape went wrong.
- Use a no-sew technique for small details. If attaching tiny nostrils or toe bumps with a needle feels fiddly, explore our article on no-sew amigurumi techniques for cleaner alternatives.
Ready to start your Diplodocus?
Grab a free pattern to warm up your skills, then dive into the full dinosaur collection when you're ready for more prehistoric fun.
Get a free patternShop amigurumi patternsFrequently asked questions
Is a Diplodocus amigurumi suitable for absolute crochet beginners?
It's best suited to beginners who have already completed one or two simple amigurumi projects and are comfortable with single crochet, increases, and decreases. If you're brand new, spend a week on our beginner crochet guide first, then tackle the Diplodocus with confidence.
What hook size should I use for a Diplodocus amigurumi?
A 3.5 mm or 4.0 mm hook with standard worsted-weight yarn gives a firm fabric that hides the stuffing. If your stitches look loose or you can see fibrefill, drop down to 3.0 mm. Our hook size chart has a full conversion table to help you choose.
How long does it take to crochet a Diplodocus?
Most crafters complete the individual pieces in 4 to 7 hours spread across a few sessions. Assembly and finishing takes another 1 to 2 hours. Watching a show you love while you work makes the time fly.
Can I make a Diplodocus amigurumi safe for a baby or toddler?
Yes, with two adjustments. Replace plastic safety eyes with embroidered eyes in black yarn, and ensure all parts are sewn very securely so nothing can be pulled off. Check local toy safety guidelines for the age group you're making for.
What type of yarn is best for a Diplodocus amigurumi?
A smooth, anti-pill acrylic like Caron Simply Soft or Lion Brand Pound of Love works beautifully — the stitches show up clearly and the finished toy is machine-washable. Avoid fuzzy or textured yarns that obscure the stitch definition. Read our full comparison in the best yarn for amigurumi guide.
How do I attach the Diplodocus neck so it stays upright?
Stuff the neck firmly all the way to the top before sewing. Attach it to the body with a mattress stitch, sewing through at least two full rounds of stitches on both pieces. A generous amount of yarn — going around the base of the neck twice — creates a strong, stable joint that holds the curve.
Can I resize the Diplodocus pattern to make it bigger or smaller?
Yes. Going up a hook size and to a bulkier yarn makes a larger version; going down a hook size with a finer yarn produces a mini Diplodocus. Our guide on how to resize a crochet pattern safely explains exactly how to adjust stitch counts without losing the proportions.
What is the difference between a Diplodocus and a Brachiosaurus amigurumi pattern?
Both feature a long neck, but the Diplodocus has a longer, whip-like tail and a lower body profile, while the Brachiosaurus has a more upright stance with shorter rear legs. In pattern terms, the tail piece for the Diplodocus requires more rounds and tapers to a fine point, making it a slightly longer project overall.