How to crochet the puff stitch (soft, beautiful texture)
The puff stitch creates irresistibly squishy, rounded clusters that look incredible on everything from bags to baby blankets — and it is much easier to work than it looks.

If you have ever scrolled past a photo of a fluffy, textured crochet pillow or a bobbly granny square bag and thought "how on earth did they do that?" — the puff stitch is probably the answer. It is one of those stitches that looks wildly impressive but only takes a few minutes to master once you understand what is happening with your yarn.
What exactly is the puff stitch?
Understanding the anatomy before you pick up your hook
The puff stitch belongs to the same family as the bobble stitch and the popcorn stitch, but it has its own distinct feel. Where a bobble uses double crochet stitches worked together at the top, the puff stitch uses multiple yarn-over-and-pull-through loops (the first step of a half double crochet) all stacked in the same hole. The result is softer and more pliable than a bobble — it lies flatter against the fabric while still popping forward beautifully.
Most patterns call for three, four, or five "yo, insert hook, yo, pull up a loop" repetitions before closing them all at once. Three loops gives a delicate puff; five loops gives a very full, rounded one. Once you know the basic motion, you can adjust the fullness to suit your project.
What you need before you start
The puff stitch works in almost any yarn, but medium-weight (worsted, size 4) acrylic or cotton lets you see exactly what is happening while you learn. A 5.0 mm hook is a good all-purpose starting point. You will also want to keep your tension a little looser than usual — tight tension makes it hard to pull all those loops through at the end.
If you are brand new to crochet, brush up on the half double crochet first, because the puff stitch is essentially a modified version of that stitch.
Step-by-step: how to work a puff stitch (US terms)
A standard 4-loop puff stitch
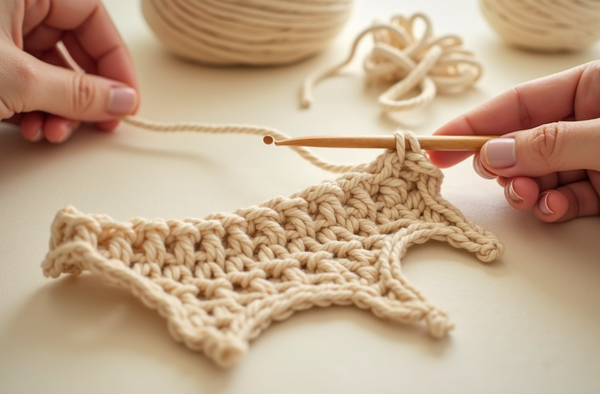
Step 1 — Chain or set up your foundation. Work to the stitch where you want your puff. For a practice swatch, chain 15 and work a row of half double crochets first so you have a firm base to puff into.
Step 2 — Yarn over, insert hook. Yarn over your hook and insert it into the stitch.
Step 3 — Yarn over and pull up a loop. Yarn over again and draw a loop up to roughly the height of a half double crochet. You should now have three loops on your hook.
Step 4 — Repeat. Without closing anything, yarn over, insert the hook into the SAME stitch, yarn over and pull up another loop to the same height. You now have five loops on your hook. Repeat once more (yarn over, insert, yarn over, pull up) to land on seven loops total.
Step 5 — Close the puff. Yarn over once and draw through ALL seven loops on your hook in one motion. You may need to wiggle the hook a little — keep your tension relaxed and it will glide through. Chain one to lock the puff closed.
That closing chain-one is important: it stops the puff from collapsing, and it is where the next puff (or the chain space) begins in many patterns.
Common mistakes — and how to avoid them
The most frequent issue new crocheters run into is uneven puff heights. Each of those pull-up loops needs to be the same height for the puff to look plump and even. Practice pulling each loop up to exactly the same point before you move on to the next one. You can use the height of a standing half double crochet as your visual guide.
The second common problem is difficulty pulling through all the loops at the close. This is almost always a tension issue — you may be gripping the yarn too tightly. Try releasing your yarn hand a little and re-wetting the loops slightly if you are working with cotton. Learning how to fix crochet mistakes will also help you recover quickly if a puff unravels before closing.
"The puff stitch is one of those magical discoveries that makes you look at a plain yarn cake and immediately start imagining pillows."— Ava, MrsCrochetWorld
Patterns that shine with the puff stitch
Once you have practiced the stitch, try it out on one of these projects — the texture pays off beautifully on every single one.

Granny Square Tote Bag Pattern
Bag · Beginner-friendlyGranny squares are a perfect canvas for scattered puff stitches — the corner-to-corner structure gives you a natural grid for placing puffs as accent rounds. This granny square tutorial pairs wonderfully with the pattern.

9 Modern Crochet Bag Patterns Bundle
Bundle · Great valueNine bag styles in one PDF — several use textured stitch variations that translate naturally to puff stitches once you are comfortable substituting. Explore the full bags collection for even more inspiration.

50 No-Sew Amigurumi Bundle
Bundle · Huge varietyAfter mastering the puff stitch you will want more things to crochet — this bundle of 50 no-sew amigurumi patterns keeps your hook busy for months. Available from our mega-bundles collection.
6 ways to use the puff stitch in your projects
The texture is versatile — here are six places it looks spectacular
Bags and totes
Puff stitches on a tote bag create gorgeous dimension that makes the bag look boutique-quality. Work them in alternating rows for an all-over bobble effect.
Flower centers
A single puff stitch in a contrasting color makes a perfect raised center for spring flower motifs. Works especially well in the magic ring.
Scarves and cowls
Alternating chains and puff stitches create an elegant lacy-yet-cozy texture ideal for scarves. The stitch works beautifully in chunky yarn for a quick weekend project.
Home décor pillows
A puff stitch pillow cover is one of the most satisfying projects to make — the texture is deeply tactile and impossible to resist squeezing. Use a firm cotton or cotton-blend for best results.
Amigurumi accents
Use a small puff stitch for noses on stuffed animals instead of safety noses — it gives your amigurumi a sewn-in, seamless look that photography loves.
Ready to level up?
Once the puff stitch clicks, you are well on your way to intermediate crochet. Visit our complete beginner guide to map out your next learning steps.
Puff stitch tips from Ava's workbench
- Loosen your foundation chain. A tight chain makes it hard to insert your hook multiple times into the same stitch. Go up one hook size just for the foundation if needed.
- Count your loops before closing. It is easy to forget a yarn-over mid-puff. Count the loops on your hook before drawing through — for a 4-loop puff you should see 9 loops (each loop adds 2, plus the original loop).
- Keep loop heights consistent. All those pull-up loops should reach the same height. Use a stitch marker or a pen cap as a visual guide beside your hook if you are struggling.
- The closing chain-one is not optional. Some beginners skip it to save time, but without it the puff collapses flat. That little chain is what gives the stitch its rounded top.
- Block lightly for even texture. A light steam block (or wet block for cotton) after finishing evens out any inconsistencies in puff size. Read our guide on how to block crochet for the full process.
- Use the right yarn weight. DK and worsted weights give the clearest, most defined puffs. Very bulky yarn can make puffs look lumpy, while lace weight makes them nearly invisible.
Ready to try your first textured pattern?
Now that you know the puff stitch, you have a whole new world of beautiful textures at your fingertips. Grab a free pattern to practice on, or dive straight into our beginner-friendly collection and put that squishy new stitch to work.
Get a free pattern Shop beginner patternsFrequently asked questions
What is the difference between a puff stitch and a bobble stitch?
The puff stitch uses half double crochet loops all pulled up to the same height and closed together in one step, creating a soft, rounded cluster. The bobble stitch uses double crochet stitches worked partially and joined at the top, resulting in a firmer, more pointed bump. Puffs tend to be squishier; bobbles are more defined.
How many loops make a puff stitch?
Most patterns use 3, 4, or 5 yarn-over and pull-up repetitions per puff. A 3-loop puff is subtler and quicker; a 5-loop puff is fuller and more dramatic. The number your pattern specifies is always listed at the start — check the stitch glossary if in doubt.
Why is my puff stitch collapsing flat?
The most common reason is skipping the closing chain-one (or chain-two in some patterns). That locking chain is what holds the puff upright. Also check that all your pull-up loops were drawn to the same height before closing — if they are uneven the puff can look lopsided and flat on one side.
Can I work puff stitches in the round?
Yes, and they look gorgeous in the round! Many circular motifs, mandalas, and bag bases use puff stitches as accent rounds. Work them the same way as flat, but be aware that the right side is always facing you, so your rows will naturally show the puff on the front of the fabric.
What yarn is best for puff stitches?
Smooth, plied yarns in DK or worsted weight show the puff shape most clearly. Acrylic and cotton both work well. Avoid very fluffy or fuzzy yarns like mohair when you are learning — the halo hides where you need to insert your hook and makes counting loops very difficult.
How do I keep my tension even when making puff stitches?
The key is to pull every loop up to exactly the same height before closing. A relaxed grip on the yarn also helps enormously — tight tension makes it hard to draw through all the loops at the end. Practice on a swatch until the motion feels natural before starting your actual project.
Can beginners learn the puff stitch?
Yes, the puff stitch is suitable for beginners who already know the chain stitch and half double crochet. If you are comfortable with those two stitches, the puff stitch is simply a matter of repeating a familiar motion several times before closing. Give yourself a small practice swatch and you will likely have it within 15 minutes.
Do I need to use a stitch marker with the puff stitch?
Stitch markers are not strictly required for the puff stitch itself, but they are very helpful for marking where each puff falls in a pattern, especially if you are working a repeating row. They also help you keep track of the closing chain-one so you do not accidentally crochet into it on the next row.