How to Crochet the Star Stitch (Daisy Stitch)
Master this stunning textured stitch and add a show-stopping pattern to blankets, bags, and more — even as a beginner.

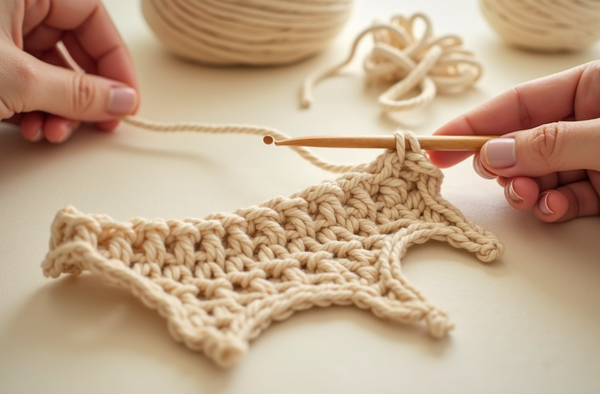
The star stitch — sometimes called the daisy stitch — is one of those stitches that looks like it belongs in an advanced pattern but is actually very approachable once you break it down into steps. Every "star" is formed by pulling up a series of loops and joining them at a center point, creating a petal-like texture that's thick, cozy, and absolutely beautiful.
What you need before you start
Keep it simple — this stitch needs nothing beyond your usual kit.
You only need a ball of medium-weight (worsted, size 4) yarn and a 5.0 mm hook. The star stitch shows up best in a solid or semi-solid color — heavy variegation can hide the definition of the petals. A smooth cotton-acrylic blend works well, though any acrylic you already own is a perfectly fine place to start. If you're unsure which yarn to grab, check out the guide on best yarn for beginners for a quick overview.
You should also be comfortable with the chain stitch and single crochet. A working knowledge of crocheting in rows is helpful, since the star stitch is most often worked flat. If you're still finding your footing with the basics, the 7-day beginner crochet guide is a great warm-up.
How the star stitch works: the anatomy of a star
Each star is made of five "spokes" pulled up together.
Here is a plain-English breakdown of one star stitch:
- Pull up a loop through the second chain from the hook (or the first stitch of the previous row), then pull up a loop through each of the next 4 stitches — you now have 6 loops on your hook.
- Yarn over and pull through all 6 loops at once. This closes the star and creates a center hole (the "eye").
- Chain 1 to lock the star and seal the eye.
- To start the next star, insert your hook back into that same eye, then pick up loops in the next 4 stitches to get 6 loops on the hook again. Repeat from step 2.
The chain-1 eye is important — it becomes the anchor for the first spoke of every following star, which is what links the motifs into a continuous fabric. After a few repeats the rhythm clicks quickly.
Foundation chain and row setup
For a practice swatch, chain a multiple of 2, plus 1. For example, chain 21 for a 10-star swatch. Your Row 1 setup row is worked in single crochet across the chain to create an even base — this makes counting easier and produces a neater edge.
On Row 2, you begin the actual star stitch. Turn your work and chain 3 (this counts as the first half-spoke). Then work across following the steps above. At the end of the row you'll finish with a single crochet into the turning chain to square off the edge.
Row 3 is another single crochet row worked into the eyes of the stars (and into any remaining stitches). Alternating star rows with SC rows creates a tidier fabric and lets you see each star clearly. If you want a denser all-star fabric you can skip the plain rows — just know it will be thicker and tighter.
If you'd like to see how increasing and decreasing can affect texture work, the article on how to count crochet stitches and rows can help you keep your stitch count accurate across every repeat.
"The star stitch looks so complicated in photos — but the moment you pull those loops through together and that little flower blooms in your hands, you'll be hooked for life." — Ava, MrsCrochetWorld
Great first projects for the star stitch
Once you've cracked the stitch, these patterns put it to beautiful use right away.

Granny Square Tote Bag Pattern
Bags & AccessoriesAfter you're comfortable with texture stitches, bag panels are the perfect next step. This tote brings together squares and surface texture in a beginner-friendly layout. Pair it with the star stitch for an accent panel. See more ideas in our crochet bags collection.

50 No-Sew Amigurumi Bundle
Amigurumi BundleA star-stitch border makes the cutest finishing touch on amigurumi blankets and carry pouches. This massive 50-pattern bundle gives you plenty of projects to experiment with once your tension is consistent. Read more about no-sew techniques in the no-sew amigurumi guide.

9 Modern Crochet Bag Patterns Bundle
Bundle · Best SellerOnce you love a textured stitch, you'll want it on everything — especially bags. This 9-pattern bundle covers totes, clutches, and crossbodies in styles that layer beautifully with star stitch panels. Browse the full bags & accessories collection for even more ideas.
Six things to know about the star stitch
Quick, practical facts that will save you time and yarn.
Always use an even chain count
The star stitch is worked in multiples of 2. Starting with an odd number throws off every repeat, so count twice before you begin.
Tension matters more here
Pulling up 5 loops at once can tighten your fabric. Try going up half a hook size from what you'd normally use for the yarn weight. Learn more in the even tension guide.
The eye chain is not a stitch
That chain-1 after closing the star locks the center but is not counted as a stitch when you work the return row. Skip over it and work into the eye instead.
Great for stash yarn
Because the stitch eats yarn quickly (all those loops!), it's a brilliant way to use up a large skein. Check out one-skein crochet project ideas for more inspiration.
Mistakes are easy to fix
Dropped a loop? Simply frog (unravel) back to the start of that star and re-pull. Because each star is self-contained, you rarely have to rip back more than one repeat.
Ready for more stitches?
The star stitch is part of a wonderful world of texture. Visit our complete beginner guide to crochet to explore puff stitch, waffle stitch, bobble stitch, and beyond.
Pro tips for a perfect star stitch every time
- Mark your eye chains. Place a stitch marker in every chain-1 eye as you go. This makes it effortless to find the correct insertion point for the next star, especially when you're learning.
- Count loops before closing. Before you yarn-over and pull through all loops, confirm you have exactly 6 on the hook. Six is the magic number — five spokes plus the starting loop.
- Keep edge stitches loose. The turning edge of each row is where the star stitch is most likely to pucker. Work the first and last star of each row a touch looser than the middle ones.
- Pair it with a plain back. For bags and pouches, a single-crochet lining tames the slightly textured wrong side and gives the project a polished finish. See how reading a crochet pattern can help you adapt any bag pattern to include a lining row.
- Block your swatch. Wet blocking opens up the stars and lets their shape really shine. Even a quick hand-wash and pin-out makes a noticeable difference in definition. The how to block crochet article walks you through the full process.
- Try it in cotton for summer projects. Cotton yarn gives the star stitch a crisp definition that works beautifully for market bags and dishcloths. Explore the easy beginner patterns collection for cotton-friendly project ideas.
Ready to put your new stitch to work?
Grab a free pattern and start making something beautiful today. Our beginner-friendly collection is full of projects that pair perfectly with the star stitch once you've got it down.
Get a free pattern Shop beginner patternsFrequently asked questions
What is the crochet star stitch?
The star stitch (also called the daisy stitch) is a textured crochet stitch where you pull up multiple loops across several stitches and close them together at a center point, creating a star or flower shape in the fabric. It is worked in US crochet terms and produces a thick, decorative surface.
Is the star stitch hard for beginners?
The star stitch looks advanced but is very approachable once you understand the loop-and-close sequence. If you can do a single crochet and chain stitch, you have everything you need. Working a small practice swatch first will help the rhythm feel natural within a few rows.
What hook size should I use for the star stitch?
A 5.0 mm hook paired with worsted weight (size 4) yarn is a comfortable starting point. Because pulling up multiple loops can tighten your gauge, many crocheters find going up half a size from their usual recommendation helps keep the fabric relaxed and even.
How many chains do I need to start a star stitch swatch?
Chain a multiple of 2 plus 1. For a beginner swatch, a chain of 21 works well and gives you approximately 10 star repeats to practice with. Working a setup row of single crochet across the foundation chain before starting the star rows helps keep your edge clean.
What is the chain-1 eye in the star stitch?
After you close the star by pulling through all 6 loops, you chain 1. This chain-1 is called the eye of the star. It locks the center of the motif and also serves as the anchor point for the first spoke of the very next star. It is not counted as a stitch in the return row.
What projects look great in the star stitch?
Blankets, scarves, cowls, pillow covers, tote bag panels, and headbands all look stunning in the star stitch. Its thick texture makes it especially cozy for winter accessories. It also works beautifully as a border or accent section within a larger crochet bag pattern.
Can I work the star stitch in the round?
The classic flat star stitch is designed for rows, but adapted in-the-round versions do exist. Working in the round requires a stitch multiple adjustment and careful attention to joining each round. For beginners, mastering the flat version in rows first is strongly recommended before attempting circular construction.
What yarn is best for the star stitch?
Smooth, solid-color or semi-solid yarn in a medium weight shows off the star shapes most clearly. Heavy variegation can camouflage the definition of each petal. Cotton and cotton-acrylic blends give a crisp look, while acrylic and wool blends produce a softer, cozier fabric — both work well.