How to add safety eyes to amigurumi
Place them perfectly every time — no wonky stares, no accidental pops, just the cutest little faces your plushies have ever had.

Safety eyes are the moment your amigurumi goes from a stuffed blob to a living, breathing character. Get them in the right spot and your little creature practically winks at you. Get them off by even one stitch and suddenly your bunny looks startled forever. The good news: once you know the method, perfect placement is repeatable every single time.
What are safety eyes and why do they matter?
A quick orientation before we dive into placement.
Safety eyes are two-part plastic fasteners: a decorative front piece (the "eye" with its visible iris) and a flat metal or plastic locking washer that snaps onto the post from behind. Once the washer clicks on, it cannot come off without significant force — which is why they're called safety eyes. They're the industry standard for amigurumi and soft toys intended for older children and adults.
Common sizes range from 6 mm (tiny details on small critters) to 18 mm (statement eyes on large teddy bears). The most versatile all-rounder for most beginner amigurumi patterns is 9 mm or 12 mm. Match the size to your gauge: if you're crocheting tight fabric with DK yarn on a 3.5 mm hook, a 6–9 mm eye often looks most natural.
What you need before you start
Gather these items and you'll be ready in under a minute:
- Safety eyes (size appropriate to your pattern)
- An awl, tapestry needle, or pencil tip to open the stitch
- Stitch markers or pins to test placement before committing
- Your amigurumi body or head piece — still open at the top and unstuffed
That last point is worth repeating: never stuff before placing safety eyes. You need clear access to the inside so you can seat the washer properly. If your pattern has you stuff partway through, pause right before that step.
Step-by-step: placing safety eyes correctly
Follow these steps in order and you'll get consistent results across every project.
Step 1 — Count your rounds. Your pattern will usually say something like "place eyes between rounds 8 and 9, 4 stitches apart." If it doesn't, a good default for a classic round head is to place eyes roughly one-third of the way down from the top, separated by 4–6 stitches. Count rounds from your magic ring upward so you know exactly where you are. Not sure how to read your piece? Our guide on how to count crochet stitches and rows has you covered.
Step 2 — Mark both spots with pins. Place a locking stitch marker or a dressmaker's pin at each candidate stitch. Step back and look at the face from arm's length. Tilt the piece, squint, pretend you're the toy's future owner. Are the eyes symmetrical? Do they give the expression you want? Move the pins now — it's free.
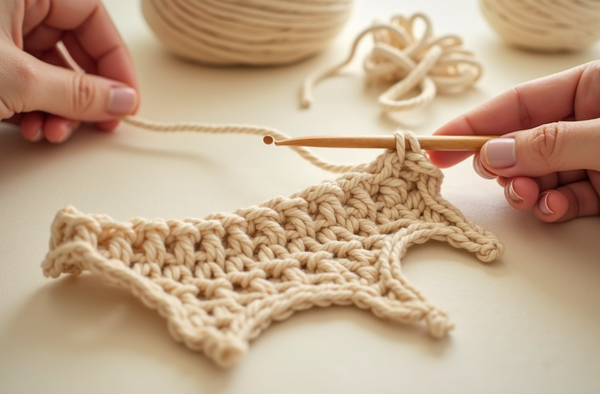
Step 3 — Open the stitch. Use the tip of your awl or tapestry needle to gently widen the V of the target stitch without breaking any yarn. You want a clean gap for the post to slide through. Do not cut the yarn.
Step 4 — Push the post through. Insert the safety eye post from the outside of your work, through the opened stitch. It should feel snug. If it wobbles, the stitch is too loose — move to a neighboring stitch or go down one hook size for your next project.
Step 5 — Snap on the washer. Reach inside the piece and slide the washer onto the post. Align the teeth of the washer with the post's ridges, then push firmly until you hear or feel a click. Give the eye a tug from the outside — it should not rotate freely or pull out. If it does, the washer isn't fully seated; press harder or use a coin to apply even pressure.
Step 6 — Repeat for the second eye. Count the same number of stitches from the center to keep them symmetrical. A handy trick: count the total stitches across the front of the head, divide by two to find the center, then place each eye an equal number of stitches left and right of that center point.
With both eyes locked, you can now stuff and close your piece as normal. Check out our full walkthrough on how to stuff amigurumi for filling tips that keep the shape round and firm without distortion.
"The eyes are the last thing you decide but the first thing everyone sees. Take an extra minute there — it's always worth it."— Ava, MrsCrochetWorld
Amigurumi patterns ready for your new eye-placement skills
Each of these comes with detailed assembly notes so you'll know exactly where to place those eyes.

50 No-Sew Amigurumi Bundle
Best SellerFifty characters, zero sewing, and every single one needs perfectly placed safety eyes. This mega bundle is a masterclass in amigurumi construction — grab it and you'll have faces to practice on for months. Pairs beautifully with our guide on no-sew amigurumi techniques.

4-in-1 Dinosaur Amigurumi Bundle
Fan FavoriteT-Rex, Stegosaurus, and friends — all needing those tiny, perfectly centered eyes that make them look delightfully fierce. Dinosaur heads are great for practicing placement because the faces are clear and uncrowded. See also: how to crochet an animal body for shaping tips that complement your eye work.

Care Bears Amigurumi Bundle
Character InspiredFour iconic bears with expressive, wide-set eyes — the exact kind of project where eye placement makes or breaks the likeness. Each pattern includes round-by-round placement notes. Explore more character-inspired crochet patterns in our shop.
Common safety eye questions answered
Quick answers to the things crafters ask most often.
Can I remove a safety eye once it's snapped?
Technically yes, but it's difficult and usually damages the washer. Use needle-nose pliers to press the washer tabs inward. Always test placement with pins first so you don't have to undo the real thing.
What if my fabric is too loose and the eye wiggles?
Use a smaller hook for the face section, or add a felt or fabric backing behind the eye inside the piece. A tiny dab of fabric glue on the washer (not the eye shaft) also helps anchor loose weaves.
How do I know what size eye to use?
Hold the eye against your finished piece before inserting it. It should fill the stitch gap naturally without distorting the surrounding stitches. Most patterns specify a size; when in doubt, 9 mm is the most versatile choice for medium amigurumi.
Are safety eyes actually safe for babies?
No. Safety eyes are named for their locking mechanism, not for infant use. For toys intended for children under 3, use embroidered eyes with yarn instead. See our full notes in the crochet for kids safety guide.
Can I use safety eyes on chunky yarn?
Yes — but go up in size. Chunky fabric has larger stitch openings, so a 6 mm eye will look lost. Try 15–18 mm eyes on super chunky projects, or use the back of the stitch to get a snugger grip.
Ready to tackle your first full amigurumi?
Eye placement is just one skill in the toolkit. If you want to build every amigurumi skill in order, our complete beginner guide to crochet walks you through every step, from your first magic ring to finishing touches.
Pro tips for flawless safety eyes every time
- Never stuff first. Always place and lock eyes before adding any stuffing — you need access to the inside to seat the washer properly.
- Use the "step back" test. After pinning your placement, hold the piece at arm's length and at eye level. Symmetry issues that are invisible up close become obvious from a little distance.
- Count from the center out. Find the center front stitch of your head, then count left and right equally. This is more reliable than counting from an edge, which can drift if your tension changed mid-row.
- Felt backing for loose fabric. Cut a tiny felt circle and slide it over the post before the washer for extra grip on open-weave or chunky fabrics — especially useful if you're working with acrylic yarn that has some stretch.
- Match eye color to character personality. Black eyes read as cute and classic; colored irises add character depth. For darker yarn colors, try amber or brown eyes rather than black — they'll show up better against deep-toned fabric.
- Seal the washer with a dab of glue for display pieces that will be handled frequently. Clear-drying fabric glue around the washer edge (not the post) adds insurance without altering the look.
Find your next amigurumi to practice on
Now that you've got the eye-placement technique down, you need a pattern worth showing off. Browse our free patterns to start for nothing, or dive into our full amigurumi collection for characters that will make those safety eyes really shine.
Get a free pattern Shop amigurumi patternsFrequently asked questions
When in the construction process should I add safety eyes?
Always add safety eyes before you stuff and close your amigurumi. You need clear access to the inside of the piece so you can slide the washer onto the post and press it firmly into place. If you stuff first, reaching inside becomes very difficult and you risk an improperly seated washer.
What size safety eyes should I use for amigurumi?
The most versatile size for medium amigurumi crocheted with DK or worsted weight yarn is 9 mm or 12 mm. Small amigurumi (3 inches or under) often look best with 6 mm eyes, while large plushies can go up to 15 or 18 mm. When in doubt, hold the eye against your finished piece before inserting — it should fit the stitch opening without distorting the surrounding fabric.
How do I make sure safety eyes are symmetrical?
Find the center front stitch of your amigurumi head first, then count the same number of stitches left and right of that center point. Mark each spot with a locking stitch marker or pin before committing. Step back and look at the face from arm's length — symmetry problems are much easier to spot from a distance than up close.
Can I remove safety eyes after they are snapped on?
Yes, but it is difficult and the washer is usually damaged in the process. Use needle-nose pliers to press the locking tabs inward while pulling the eye from the front. Because removal is tricky, always test your placement thoroughly with pins before inserting the real eyes.
Are safety eyes safe for baby toys?
No. Despite the name, safety eyes are not suitable for toys intended for children under 3 years old because the post and washer can become a choking hazard if removed. For infant-safe toys, embroider eyes with yarn instead. Always check the age recommendation on your pattern before using any hard plastic fasteners.
What can I do if a safety eye wiggles or feels loose?
A loose eye usually means the stitch opening is larger than the post diameter. Try moving to a neighboring stitch that has a tighter weave, or place a small circle of felt over the post before snapping on the washer. The felt acts as a backing that grips the post more securely. A tiny amount of clear fabric glue around the washer edge after locking can also help on very open fabrics.
How do I open a stitch without breaking the yarn?
Use the blunt tip of a tapestry needle, an awl, or even a pencil tip to gently push apart the two legs of the V-shaped stitch you want to use. Work slowly and apply sideways pressure rather than pushing straight down. The goal is to widen the gap enough for the safety eye post to slide through without snapping any yarn fibers.
Can I use safety eyes on super chunky yarn amigurumi?
Yes — just size up. Chunky fabric has larger stitch openings, so small eyes look out of proportion and may not grip well. For super chunky projects, try 15 mm to 18 mm safety eyes. You can also use the back loop or the base of a stitch rather than the open V to get a tighter hold on thicker yarn.