How to Crochet a Cone: The Increase Formula That Works Every Time
One simple rule turns a flat circle into a smooth, pointed cone — and unlocks trees, hats, carrots, ice cream and gnomes.

The cone is the shape nobody teaches you, and the shape you suddenly need the moment you want to make a Christmas tree, a gnome hat, a carrot, an ice cream, a party hat, a unicorn horn or a witch hat. Most beginners try to improvise it, end up with something that either flares out like a bowl or stays stubbornly tube-shaped, and quietly give up. The frustrating part is that a cone is not a difficult shape at all. It is the easiest of all the amigurumi shapes to control, because it runs on one single number that you choose at the start and then never think about again.
That is the whole secret. A cone is not a separate technique you have to learn — it is a flat circle slowed down. Once you understand that the increase rate controls the angle of the wall, you stop following cone patterns and start designing your own, at any height and any steepness you like. In this guide you will get the formula, the exact round-by-round numbers for three different cone angles, the placement rule that keeps the surface smooth instead of hexagonal, the fixes for the four problems every cone maker hits, and a shortlist of projects that are really just cones in disguise.
Everything here uses US crochet terms, worsted or DK weight cotton, and a hook one or two sizes smaller than the yarn band recommends — the standard amigurumi setup that keeps stitches tight enough that no stuffing shows through. If you are brand new to working in the round, read the magic ring and flat circle guides linked below first, then come back. The cone will make instant sense afterwards.
The three shapes that come from one formula
Circle, cylinder and cone are not three techniques. They are three settings of the same dial.

Increase rate is the only dial you turn
When you work in a spiral, every round needs a certain number of extra stitches just to keep the piece lying flat. For a circle started with 6 stitches, that magic number is 6 increases per round: round 2 has 12, round 3 has 18, round 4 has 24, and the disc stays perfectly flat forever. Take all six increases away and the piece has no room to grow outward, so the wall turns 90 degrees and climbs straight up as a cylinder. Everything between those two extremes is a cone. Three increases per round is half of six, so the wall tilts roughly halfway between flat and vertical — a classic medium cone. Two increases per round makes a slimmer, more elegant cone. Four makes a wide, shallow one. You are not learning three shapes, you are choosing one number.
Read the flat circle formula first →
Where you put the increases decides smooth or hexagonal
A cone with three increases per round can look like a smooth ice cream cone or like a crumpled paper hat, and the difference is nothing but placement. If you stack your increases directly above each other round after round, you build three visible ridges down the cone and the silhouette turns into a triangular prism. The fix is to stagger them: shift the starting point of the increase group by a few stitches each round so the extra stitches spiral around the piece instead of lining up. The easiest reliable method is to divide the round into equal sections, place one increase at the end of each section, and then on the next round offset the division point by two or three stitches. The eye reads a spiral as smooth and a stack as a corner.
Learn the matching decrease technique →
One shape, a whole shelf of projects
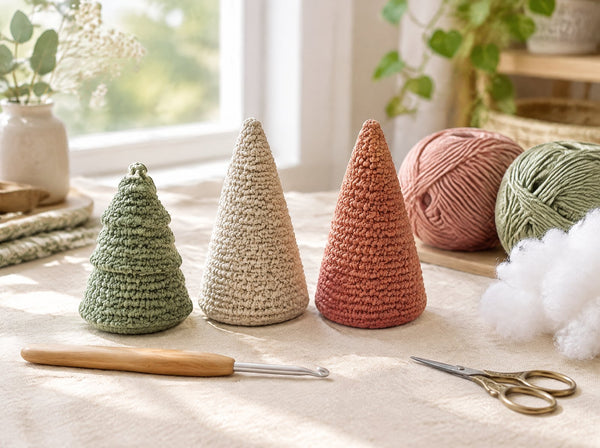
Once the cone is in your hands you will start seeing it everywhere. A green cone with a star on top is a Christmas tree. A tall narrow cone in dusty rose is a gnome hat. An orange cone with a leafy top is a carrot. A tan cone with a ball of cream yarn on top is an ice cream. Turn a cone upside down and it is a witch hat, a party hat, a unicorn horn, a rocket nose, a tiny bouquet wrap or the beak of a bird. Very few shapes in amigurumi pay you back this quickly, which is exactly why it is worth spending one evening getting the formula into your fingers rather than hunting for a separate pattern every time.
Browse amigurumi patterns →How to crochet a cone, step by step
This is the medium cone — three increases per round, the most useful all-purpose angle. Work in a continuous spiral without joining or chaining, and keep a stitch marker in the first stitch of every round. US terms throughout.
- Make a magic ring with 6 single crochet. Pull it tight so the tip of the cone closes completely. The tip is the most visible part of a cone, so a loose magic ring is the first thing people notice. If the ring will not close cleanly, tug the tail firmly before you move into round 2, not afterwards.
- Place your marker immediately. Clip a locking stitch marker into the very first stitch of round 1. A spiral has no seam to count from, and a cone is unforgiving about lost rounds because a missed increase shows as a dent in the wall. Move the marker up as the first stitch of every new round.
- Round 2: increase 3 times, evenly spaced. Work single crochet into the first stitch, then 2 single crochet into the next, and repeat that pairing around. You end round 2 with 9 stitches. Already the piece will want to curve rather than lie flat — that is the cone forming.
- Round 3 onwards: add exactly 3 stitches per round. Spread the three increases roughly evenly around the round and shift where they fall each time. Round 3 gives 12, round 4 gives 15, round 5 gives 18, round 6 gives 21, and so on in steps of three. The stitch count is the only thing you need to track.
- Stagger the increase positions every round. After you work an increase, count a couple of extra plain stitches before the next one compared to the previous round. Over several rounds the increases walk around the cone in a slow spiral and the wall stays smooth.
- Keep going until the base is the diameter you want. There is no fixed end round. Lay the cone flat and measure across the opening. Stop when the width matches your project — about 12 to 15 rounds makes a small tree or gnome hat in worsted cotton.
- Stuff lightly as you go, not at the end. A cone narrows to a point, so once the opening is small you can no longer reach the tip. Push a pinch of fiberfill up into the point around round 6 to 8, while your fingers still fit, then add more as you climb.
- Finish the base. For a closed cone, work a flat circle separately in the same stitch count and whipstitch it on, or decrease the opening shut if the cone sits on a shelf. For a hat, simply fasten off and leave the opening as the brim.
- Fasten off with an invisible finish. Cut the yarn, pull it through the loop, then thread it under the V of the next stitch and back down through the centre of the last stitch. This closes the round without leaving the small step a plain fasten-off creates.
- Weave the tail inside the cone. Push the needle through the stuffing and out the far side, pull gently, and snip close to the surface. The tail disappears into the filling and cannot work its way loose.
The cone cheat sheet: three angles, round by round
Pick your increase rate from the project, then follow the matching column. All three start from a 6-stitch magic ring.
| Round | Slim cone (2 inc) | Medium cone (3 inc) | Wide cone (4 inc) |
|---|---|---|---|
| 1 | 6 | 6 | 6 |
| 2 | 8 | 9 | 10 |
| 3 | 10 | 12 | 14 |
| 4 | 12 | 15 | 18 |
| 5 | 14 | 18 | 22 |
| 6 | 16 | 21 | 26 |
| 8 | 20 | 27 | 34 |
| 10 | 24 | 33 | 42 |
| 12 | 28 | 39 | 50 |
| 15 | 34 | 48 | 62 |
| Best for | Unicorn horns, carrots, tall gnome hats | Christmas trees, ice cream, witch hats | Party hats, shallow skirts, bird beaks |
Notice that the slim cone grows slowly and climbs high before it gets wide, while the wide cone spreads fast and stays short. If you want a tall slender tree, pick the 2-increase column and simply work more rounds. If you want a squat cheerful gnome, take the 4-increase column and stop early. The formula scales in both directions without ever changing technique.
Four problems every cone maker hits
These four complaints cover almost every cone that goes wrong, and each has a one-line fix.
Cone troubleshooting at a glance
- My cone has visible corners. Your increases are stacking. Offset the increase positions by two or three stitches each round so they spiral instead of lining up.
- My cone is flaring into a bowl. You are increasing too fast for the height you want. Drop from four increases per round to three, or from three to two.
- My cone looks like a tube with a pointy hat. You increased for a few rounds and then stopped. A cone needs the same increase count on every single round, all the way to the base.
- Stuffing shows through the stitches. Go down one hook size. Cone walls stretch more than cylinder walls because every round is under outward tension.
- The tip has a hole. The magic ring was not pulled fully closed. Tighten it in round 1 and thread the starting tail through the ring a second time before weaving it in.
- The cone leans to one side. Your increases are concentrated on one half of the round. Count the plain stitches between increases and keep the gaps roughly equal.
How tall will my cone be?
Height is not something you set directly — it is a consequence of the increase rate and the number of rounds. In worsted weight cotton on a 3.0 mm hook, one round is roughly 4 to 5 mm of height. A 15-round medium cone therefore stands about 7 cm tall with a base around 9 cm across. The slim cone at the same 15 rounds reaches the same height but with a base of only about 6 cm, which is why it reads as elegant rather than chunky.
If a pattern gives you a finished size and you want to hit it exactly, crochet six rounds, measure the height and the width, and scale from there. This takes two minutes and saves you from finishing an entire tree that turns out too small for the ornament you planned. Gauge matters more on cones than on most shapes, because the error compounds with every round rather than staying constant.
Working a cone from the wide end instead
Everything above builds the cone from the tip downward, which is the standard approach and the easier one for beginners because the stitch count only ever grows. You can also work from the wide end upward by starting with a chain joined into a ring and decreasing instead of increasing. The arithmetic is identical in reverse: three decreases per round produces the same medium cone.
Which direction should you pick? Build from the tip when the cone is a standalone object like a tree or a carrot, because the closed point is cleaner and you can stuff as you go. Build from the wide end when the cone is a hat that has to fit over an existing amigurumi head, because you can try it on repeatedly as you shape it and stop at exactly the right moment. Most gnome and witch hat patterns use the top-down tip method anyway, since gravity does the fitting for you.
Yarn and hook choices that flatter a cone
Cotton is the best yarn for cones and it is not close. A cone has to hold a rigid geometric silhouette, and cotton has almost no memory or stretch, so the walls stay crisp and the point stays sharp. Acrylic works but softens the angles slightly. Avoid anything fluffy or brushed for your first cone — faux fur and chenille hide the stitch definition completely, which means you cannot see your increases and cannot count your rounds.
For hook size, go one to two sizes below the yarn band. A worsted cotton labelled for 5.0 mm wants a 3.0 or 3.5 mm hook in amigurumi. The tighter fabric matters more on cones than on spheres because the angled wall is constantly pulling the stitches apart, and a loose cone will show stuffing along the whole slope rather than just at the seams.
A cone is just a circle that changed its mind about staying flat.— Ava, MrsCrochetWorld
Keep exploring

The six-increase rule the cone formula is built on, explained from scratch.
Read the guide →
The matching ball formula — pair it with a cone for ice cream and gnomes.
Read the guide →
Five holiday ornaments including a cone-based tree, as an instant PDF.
View pattern →
Fifty beginner-friendly plushie patterns in one downloadable collection.
View pattern →Start with a tight ring
The tip is the first thing anyone looks at on a cone. Pull the magic ring fully closed in round 1 and secure the tail twice.
One marker, every round
A spiral gives you no seam to count from. The marker is what stops a missed increase from becoming a permanent dent.
Stuff before it closes
Push filling into the point around round 6 while your fingers still fit. You cannot reach the tip once the cone grows.
Frequently asked questions
How many increases per round do I need for a cone?
Any number between one and five per round makes a cone when you start from a 6-stitch magic ring. Three increases per round is the reliable all-purpose choice and gives a shape close to a classic Christmas tree or ice cream cone. Two increases gives a slimmer, taller cone and four gives a wide, shallow one. Six increases per round would flatten the piece into a circle, and zero increases would turn it into a straight tube.
Why does my crochet cone look hexagonal instead of round?
Your increases are stacking directly above each other, which builds visible ridges down the cone and turns the silhouette into a faceted prism. Shift the position of your increases by two or three stitches on every round so the extra stitches spiral around the piece. The eye reads a spiral as a smooth curve and a vertical stack as a corner.
Should I crochet a cone from the point or from the wide end?
From the point is easier and more common, because the stitch count only grows, the tip closes cleanly with a magic ring, and you can stuff as you work. Start from the wide end with decreases instead when you are making a hat that has to fit over a finished amigurumi head, since you can try it on as you shape it and stop at the right moment.
How do I stop stuffing from showing through my cone?
Drop one hook size. Cone walls are under constant outward tension because every round is wider than the one below it, so the fabric stretches more than it would on a cylinder. A worsted cotton labelled for a 5.0 mm hook should be worked on a 3.0 or 3.5 mm hook for amigurumi, and the gaps will close.
How tall will my cone be?
In worsted weight cotton on a 3.0 mm hook, one round adds roughly 4 to 5 mm of height. A 15-round medium cone stands around 7 cm tall with a base about 9 cm across. Height is a result of your increase rate and round count rather than something you set directly, so crochet six rounds, measure, and scale from there.
Can I crochet a cone without a magic ring?
Yes. Chain two and work six single crochet into the second chain from the hook, then continue exactly as normal. The tip will be slightly less tidy than a pulled-tight magic ring and may leave a small hole, so thread the starting tail through the base stitches once before weaving it in to close the gap.
What yarn works best for crochet cones?
Cotton, by a clear margin. Cones need to hold a rigid geometric silhouette and cotton has almost no stretch or memory, so the walls stay crisp and the point stays sharp. Acrylic works but softens the angles slightly. Avoid faux fur and chenille for a first cone because they hide the stitch definition and make your increases impossible to count.
How do I close the bottom of a cone?
You have two options. Crochet a separate flat circle in the same stitch count as your final round and whipstitch it onto the opening, which gives a clean flat base that stands upright. Or decrease the opening closed in the same rhythm you used to increase, which gives a rounded, pillow-like underside. Use the flat circle for trees and gnomes that need to stand.
Why is my cone leaning to one side?
Your increases are clustered on one half of each round rather than spread evenly. Count the plain stitches between each increase and make the gaps as equal as the stitch count allows. On rounds where the number does not divide evenly, put the extra stitch in a different gap each time rather than always in the same place.
Can I use the cone formula with double crochet?
Yes, and the increase numbers stay the same, but the fabric changes character completely. Double crochet rounds are much taller, so the cone grows in height far faster and the looser stitches will show stuffing. Taller stitches suit decorative cones like hats and tree skirts, while single crochet remains the standard for anything stuffed.
What crochet projects are actually cones?
Christmas trees, gnome hats, witch hats, party hats, unicorn horns, carrots, ice cream cones, bird beaks, rocket noses, flower bouquet wraps and the tails of many amigurumi animals. Once you can crochet a cone on demand, a surprising share of seasonal and character patterns stops needing a separate tutorial.
Do I need a stitch marker for a cone?
Yes, more than for almost any other shape. Cones are worked in a continuous spiral with no join, so there is no seam to count from, and because every round has the same fixed increase count, a single missed increase shows permanently as a dent in the wall. Clip a locking marker into the first stitch of each round and move it up as you go.
Put your new cone to work
You have the formula. Now turn it into a tree, a gnome or a whole shelf of handmade gifts with a tested MrsCrochetWorld pattern.
Shop Christmas patterns Get a free pattern