How to Crochet a Half Sphere: The Dome Formula That Always Works
One repeatable increase pattern turns a flat circle into a smooth, self-supporting dome — the shape behind every amigurumi head, paw pad, hat crown and trinket bowl.

A half sphere is the single most useful shape in amigurumi, and almost nobody teaches it as its own skill. We learn the flat circle, we learn the full ball, and then we are left guessing at everything in between. The result is familiar to every maker: a head that bulges at the equator, a paw pad that will not sit flat, a hat crown that cups like a bowl instead of hugging a skull. The shape is not the problem. The spacing of the increases is.
That is the whole secret, and it is worth saying plainly before we unpack it: a flat circle and a half sphere use the same increases, just at a different rate. A flat circle adds six stitches every single round forever. A sphere adds six, then slows down, then stops. A half sphere is simply the first half of that slowdown — the moment the fabric stops growing outward and starts turning upward.
Once you can feel that transition under your fingers, you stop needing a pattern for basic shapes at all. You can size a dome to any diameter, match it to a cylinder you already crocheted, and shape a head that looks intentional rather than accidental. This guide gives you the formula, the round-by-round numbers for four common sizes, the three mistakes that ruin a dome, and the way to adapt all of it to stitch counts other than six.
Understanding the shape before you count a single stitch
Three ideas do almost all the work. Get these and the numbers become obvious instead of memorised.

A dome is a circle that was told to stop growing
Crochet fabric lies flat only when the number of stitches grows at exactly the rate the circumference grows. Add six stitches per round to a 6-stitch start and you get a perfect flat circle that will keep lying flat until you run out of yarn. Add fewer than six, and the outer edge becomes too short for the fabric inside it. That tension has to go somewhere, so the piece lifts. Add none at all and the edge simply walks straight upward as a tube. A half sphere is the controlled middle: you reduce the increases gradually, so the fabric curves smoothly instead of kinking at one hard line.
Read the flat circle formula first →
Taper the increases, never cut them off
The most common dome failure is going from a full increase round straight to plain rounds. The fabric has no way to ease into the curve, so you get a visible rim — a flat brim with a wall sticking out of it. Instead, step the increases down: every stitch, then every second, every third, every sixth, every fourteenth, then none. Each round adds less than the one before, so the curve builds in small increments. Spread those final sparse increases evenly around the round rather than stacking them, or the dome will develop a lopsided corner you cannot block out.
See how the full sphere continues →
The shape hiding in nearly every pattern you own
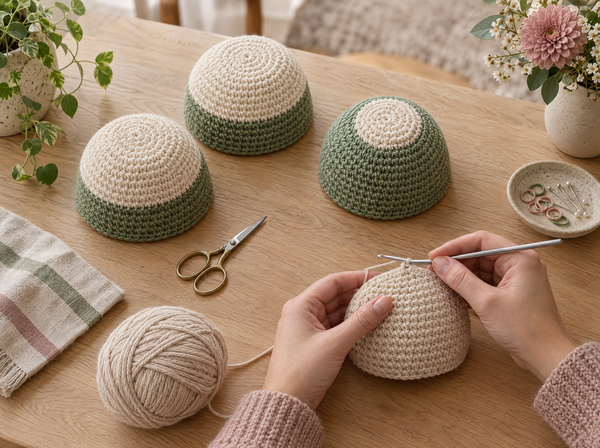
Once you recognise a dome you will see it everywhere. Every amigurumi head begins as one. Muzzles, cheeks, snouts and bellies are domes. Paw pads, ear bases and the flat-bottomed half of a mushroom cap are domes. Hat crowns, bowl bases, pincushions, bauble halves and the rounded lid of a crocheted jar are domes. Learning the shape once means you can read a pattern and know why round 5 only has four increases — and you can fix it when the designer got the spacing wrong.
Browse amigurumi patterns →The half sphere formula, round by round
Work in continuous spiral rounds of single crochet unless a pattern tells you otherwise, and mark the first stitch of every round. All abbreviations are US terms: sc is single crochet, inc means two single crochet in the same stitch, and a number in parentheses is the stitch count at the end of that round.
- Start with a magic ring of 6 sc. Pull the tail firmly closed before you move on. A loose ring leaves a hole at the top of the dome that stuffing will push through, and no amount of later tightening fully fixes it.
- Round 2 — increase in every stitch. Six increases, twelve stitches. This round is identical to a flat circle; the dome has not started curving yet.
- Round 3 — increase in every second stitch. Work 1 sc, inc six times for eighteen stitches. Still flat, still growing at full rate.
- Round 4 — increase in every third stitch. Work 2 sc, inc six times for twenty-four stitches. This is the last full-rate round, and the widest point of your dome is now set.
- Round 5 — drop to four increases. Work 5 sc, inc four times for twenty-eight stitches. You should feel the edge begin to resist lying flat. That resistance is the curve starting.
- Round 6 — drop to two increases. Work 14 sc, inc twice for thirty stitches. The piece now clearly cups when you set it down.
- Round 7 — plain round, no increases. Thirty single crochet. The edge turns upward and the dome holds its own shape.
- Stop, or continue straight. If you want a pure half sphere, fasten off here. If you need a dome with a short wall — a bowl, a hat crown, a head that continues into a body — keep working plain rounds of 30 until you reach the height you want.
Four sizes, pre-calculated
Use whichever final stitch count matches the piece you need to join it to. The pattern is always the same: full-rate increases, then a tapering tail. Each column below ends at a plain round, ready to continue or fasten off.
| Round | Small dome | Standard dome | Large dome | Extra large dome |
|---|---|---|---|---|
| 1 | 6 sc in ring (6) | 6 sc in ring (6) | 6 sc in ring (6) | 6 sc in ring (6) |
| 2 | inc every st (12) | inc every st (12) | inc every st (12) | inc every st (12) |
| 3 | 1 sc, inc (18) | 1 sc, inc (18) | 1 sc, inc (18) | 1 sc, inc (18) |
| 4 | 3 sc, inc ×4 (22) | 2 sc, inc (24) | 2 sc, inc (24) | 2 sc, inc (24) |
| 5 | 10 sc, inc ×2 (24) | 5 sc, inc ×4 (28) | 3 sc, inc (30) | 3 sc, inc (30) |
| 6 | plain (24) | 14 sc, inc ×2 (30) | 9 sc, inc ×3 (33) | 4 sc, inc (36) |
| 7 | — | plain (30) | 16 sc, inc ×2 (35) | 11 sc, inc ×3 (39) |
| 8 | — | — | plain (35) | 19 sc, inc ×2 (41) |
| 9 | — | — | — | plain (41) |
| Approx. diameter | 1.6 in / 4 cm | 2 in / 5 cm | 2.4 in / 6 cm | 2.8 in / 7 cm |
Diameters assume worsted weight cotton or acrylic with a 3.0 mm hook and firm amigurumi tension. Looser tension or a larger hook makes every dome proportionally bigger without changing a single stitch count, which is exactly why gauge matters more than hook labels when you are matching two pieces together.
Four habits that make dome edges look professional
- Move the stitch marker before you work the first stitch of each round, not after. Marking afterwards is how counts drift by one without you noticing.
- Never place two increases next to each other in the sparse rounds. Count the gap, then place the increase in the middle of it.
- Offset the increase positions from round to round. Stacking them vertically creates visible seams radiating from the centre like the spokes of an umbrella.
- Work one hook size smaller than the yarn label suggests. Dense fabric holds a curve; loose fabric collapses under stuffing and shows the fill through the gaps.
A dome is not a harder shape than a circle. It is the same shape, told when to stop.— Ava, MrsCrochetWorld
Three problems, and what actually causes them
Almost every unhappy dome traces back to one of three causes. None of them require you to start over if you catch them early.
It still lies flat like a plate
You kept increasing at full rate for too many rounds. Six new stitches per round will hold the fabric flat indefinitely, so if rounds 5 and 6 still contain six increases each, you have crocheted a bigger circle rather than a dome. Count the increases in your last two rounds. If either has six, frog back to round 4 and restart the taper. This is the single most common mistake, and it is also the easiest to spot: set the piece on a table and see whether the rim touches down all the way around.
There is a hard rim where the curve should be
You cut the increases off too abruptly — usually by going from a full increase round straight to plain rounds. The fabric has no transition, so it folds at one line instead of curving across several rounds. Rip back two rounds and insert the intermediate steps: four increases, then two, then none. The extra two rounds cost you five minutes and completely change the silhouette.
It curves, but it is lumpy or lopsided
Your sparse increases are badly placed. When round 5 has four increases, they need to sit roughly a quarter of the round apart. If three of them land in the first half and one in the second, that first half grows more and the dome tilts. The same applies to round 6: two increases belong on opposite sides, not six stitches apart. Count your stitch gaps rather than eyeballing them, and the lumps disappear.
Adapting the formula to any starting count
Not every pattern begins with six stitches. Larger amigurumi and hats often start with eight, and some designers prefer seven for a slightly rounder crown. The formula scales without any new maths: the number you start with is the number of increases a flat round adds.
Start with eight stitches in the magic ring and a flat circle adds eight per round — round 2 is 16, round 3 is 24, round 4 is 32. To taper into a dome, cut the increase count roughly in half each round: round 5 gets four increases, round 6 gets two, round 7 is plain. With a seven-stitch start, flat rounds grow by seven, so you taper from seven increases to three, then one, then none. The pattern of the taper matters far more than the exact numbers; halving the increases each round produces a smooth curve at any scale.
The same logic works in reverse for the top of a dome you are closing, which is why the decrease sequence in a sphere mirrors the increase sequence. If you can taper upward, you can taper downward, and between those two skills you can shape nearly any rounded amigurumi body without a written pattern.
Stuffing a dome so it keeps its shape
A dome is only half enclosed, so it is more fragile than a ball. Stuff it firmly and the curve becomes smooth and taut; stuff it lightly and the fabric sags into a dimple at the top. Add small pinches of fibrefill rather than one large wad, pushing each piece out to the edges with the blunt end of your hook before adding the next. If the dome will be sewn onto a flat surface — a paw pad, a cheek, a mushroom cap — cut a small circle of felt or card to the finished diameter and insert it before closing, which keeps the rim perfectly round and stops the stuffing from bulging out at the join.
For domes that sit open as bowls or baskets, skip the stuffing entirely and rely on tension and fibre. Cotton holds a dome shape far better than soft acrylic, and a single round of slip stitch or reverse single crochet around the open edge stiffens the rim enough to stand up on its own.
Keep exploring

Fifty beginner-friendly plushie patterns that put the dome formula straight to work.
View pattern →
Take the dome all the way around with the mirrored increase and decrease formula.
Read the guide →
The third shape formula, for snouts, hats, trees and pointed amigurumi tails.
Read the guide →
Ten animal patterns built from domes, spheres and cylinders you can now shape yourself.
View pattern →Match it to a cylinder
End your dome on the same stitch count as the tube it joins, and the seam disappears. A 30-stitch dome sits perfectly on a 30-stitch body with no easing or gathering.
Check it on a flat surface
Set the piece down after every round from round 4 onward. The moment the rim stops touching the table all the way around, your curve has begun exactly on schedule.
Write your taper down
Note the increase count per round as you go: 6, 6, 6, 4, 2, 0. That short sequence is a reusable recipe you can scale to any dome you need later.
Frequently asked questions
What is the difference between a half sphere and a flat circle in crochet?
A flat circle adds the same number of increases every round forever, so the fabric keeps lying flat. A half sphere starts the same way but gradually reduces the increases, so the outer edge becomes too short for the fabric inside it and the piece curves upward into a dome. The stitches are identical; only the rate of increase changes.
How many rounds does a half sphere need?
A standard 6-stitch dome finishing at 30 stitches takes seven rounds: three full increase rounds, two tapering rounds and one plain round. Small domes need six rounds, large domes eight, and extra large nine. The number of rounds always grows with the finished diameter, not with the yarn weight.
Why does my half sphere stay flat instead of curving?
You are still adding six increases per round. Six new stitches on a 6-stitch start is exactly the rate that keeps crochet flat, so the piece simply becomes a larger circle. Count the increases in your last two rounds and cut them down to four, then two, then none.
Why does my dome have a hard rim instead of a smooth curve?
You went from a full increase round straight into plain rounds, which gives the fabric no transition and makes it fold along a single line. Insert intermediate rounds with four increases and then two increases before the first plain round, and the fold spreads into a curve.
Where should I place the increases in the sparse rounds?
Spread them evenly around the round. Four increases belong roughly a quarter of the round apart, and two increases belong on opposite sides. Count the stitch gaps rather than guessing, and never place two increases next to each other or the dome will tilt.
Can I crochet a half sphere starting with eight stitches instead of six?
Yes, and the logic is unchanged. An 8-stitch start means a flat round adds eight stitches, so work three full increase rounds to 32 stitches, then taper by roughly halving: four increases, then two, then a plain round. Any starting count works as long as you taper gradually.
Should I work a half sphere in spiral rounds or joined rounds?
Spiral rounds are better for amigurumi because they leave no visible seam line up the side of the dome. Use joined rounds only when a pattern needs a defined starting point for colour work or when you want a crisp edge, and accept that the join will show as a faint ridge.
What hook size should I use for a crocheted dome?
Go one size smaller than the yarn label recommends. Worsted weight yarn labelled for a 4.0 mm hook works beautifully on a 3.0 or 3.5 mm hook for domes. The tighter fabric holds its curve and hides the stuffing, while a loose fabric sags and shows fill through the gaps.
How do I stop stuffing showing through my half sphere?
Use a smaller hook for denser fabric, and line the inside with a scrap of white or colour-matched felt before stuffing. Add fibrefill in small pinches pushed out to the edges rather than one large wad, which prevents both the show-through and the lumps.
Can I use a half sphere as an amigurumi head?
Yes — nearly every amigurumi head is a dome that continues into plain rounds and then mirrors the increases as decreases to close. Work the dome to your target stitch count, add plain rounds for height, then decrease in the reverse order of your increases for a smooth, symmetrical head.
What yarn holds a dome shape best?
Cotton and cotton blends hold a crisp curve because the fibre has little memory and does not stretch under stuffing. Soft acrylic and chenille feel lovely but relax over time, so a dome in those fibres needs firmer stuffing or a felt liner to stay rounded.
How do I make a half sphere that sits flat as a bowl?
Skip the stuffing and finish the open edge with one round of slip stitch or reverse single crochet, which stiffens the rim enough to stand alone. Work in cotton at tight tension, and keep the final plain rounds short so the walls stay low and the bowl does not collapse inward.
Put the dome formula to work
Every plushie in our pattern library is built from the same handful of shapes you now know how to crochet from scratch.
Browse amigurumi patterns Get a free pattern