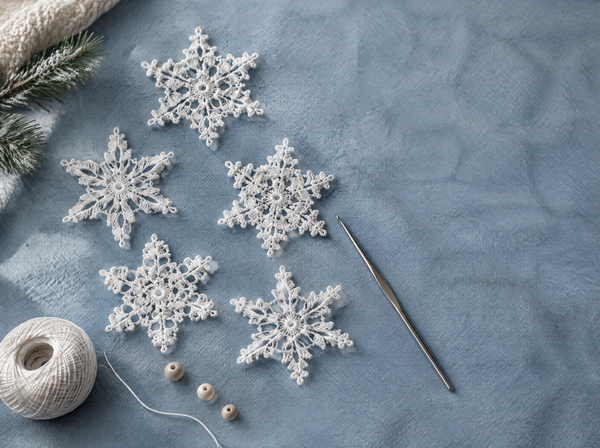
How to Crochet a Snowflake: Easy Step-by-Step Guide for Beginners
Make a crisp, flat six-point crochet snowflake in under 30 minutes, then stiffen it so it hangs perfectly on your tree, window or gift wrap.

A crochet snowflake is the perfect small winter project. It uses one tiny ball of thread, takes about twenty to thirty minutes once you know the rhythm, and it turns into something you actually hang up and keep for years. It is also the fastest way to learn chain spaces, slip stitch joins and picot points without committing to a blanket.
In this guide you get the full written pattern in US crochet terms, the exact materials that give a crisp result, a plain-English explanation of why snowflakes curl and how to fix it, three stiffening methods compared, and sizing guidance for ornaments, garlands and gift tags. Every step is written for a beginner who can chain and single crochet. If you cannot yet, start with our single crochet lesson first and come back in twenty minutes.
Snowflakes are worked in the round, from the centre outward, and almost every pattern you will meet follows the same architecture: a small dense centre, a round of spokes, and a decorative outer round. Once you understand that architecture you can read any snowflake pattern on the internet, and you can design your own. That is the real goal of this article, not just one pattern.
The three building blocks of every crochet snowflake
Learn these three parts and you can read, adapt or invent any snowflake pattern.

A tight centre keeps the star flat
Every snowflake begins with a small closed circle. A magic ring is best because you pull the tail and the hole disappears completely. Work 12 single crochet into the ring. Twelve is the magic number: it divides cleanly by six, so your six arms land at perfectly even intervals, and it is dense enough that the centre does not stretch into an oval when you hang the finished piece. If your centre looks loose or gappy, your hook is too large for your thread, not your tension.
Master the magic ring first →
Chain spaces become the six arms
The second round turns a circle into a star. You work a short anchor stitch into the centre, then a chain of three to five, and skip a stitch before the next anchor. Those chains are the spokes. Longer chains give a wide airy snowflake; shorter chains give a compact dense one. This is the single most useful dial in snowflake design: change the chain count and you change the whole character of the piece without touching anything else in the pattern.
How flat circles and spacing work →
Picots and long chains make it read as a snowflake
The outer round is what makes people recognise a snowflake rather than a doily. The trick is a picot: chain three, then slip stitch back into the first of those chains to form a tiny bobble point. Put a picot at the end of each arm and one on each side, and you instantly get the crystalline branching look of real frost. Finish with a long chain loop on one arm so you have somewhere to thread the ribbon without piercing the lace.
Browse all MCW patterns →Materials: what actually gives a crisp snowflake
You can crochet a snowflake from any yarn, but the result changes completely with thickness. Thread gives lace. Worsted yarn gives a chunky soft star that looks more like a toy than frost. For ornaments, thread wins every time.
| Material | Hook | Finished size | Best for |
|---|---|---|---|
| Size 20 cotton thread | 1.50 mm steel | 2 to 2.5 in | Delicate gift-tag flakes, earrings |
| Size 10 cotton thread | 1.75 to 2.00 mm steel | 3 to 3.5 in | Classic tree ornaments, best starting point |
| Size 3 cotton thread | 2.75 mm | 4 to 4.5 in | Window hangers, garlands, beginners |
| Sport or DK cotton | 3.25 mm | 5 to 6 in | Soft chunky stars, coasters, kids' decor |
| Worsted acrylic | 4.00 mm | 6 to 7 in | Wall hangings, learning the shape only |
White is traditional, but icy pale blue, silver metallic blend and cream all look beautiful on a tree. Avoid dark colours for your first attempt: you cannot see your own stitches clearly in dark thread, and snowflakes are fiddly enough without fighting the light.
Beginner shortcuts that genuinely help
- Start with size 3 thread and a 2.75 mm hook. The stitches are big enough to see, and the shape is identical to the fine version.
- Use a stitch marker in the first stitch of every round. Snowflake rounds are short and easy to lose count in.
- Work on a dark surface. A dark tea towel on your lap makes white thread readable.
- Make three identical flakes before changing anything. Repetition teaches the rhythm faster than switching patterns.
- Leave a 6 in starting tail. You will want it for weaving in and for pulling the centre closed.
The pattern: a classic six-point snowflake
Written in US crochet terms. Abbreviations: ch = chain, sc = single crochet, dc = double crochet, tr = treble crochet, sl st = slip stitch, ch-sp = chain space, st = stitch, rep = repeat.
- Round 1 — the centre. Make a magic ring. Work 12 sc into the ring. Pull the tail firmly to close the hole. Join with sl st into the first sc. You have 12 stitches.
- Round 2 — mark the six arms. Ch 1. Work 1 sc in the same stitch, then ch 3 and skip the next stitch. Rep sc, ch 3, skip around the round. You end with six sc and six ch-3 spaces. Join with sl st into the first sc.
- Round 3 — build the spokes. Sl st into the first ch-3 space. In that space work: ch 4, 1 tr, ch 4, 1 sc. That sc anchors the arm. Move to the next ch-3 space with a sl st and repeat five more times. You now have six distinct arms radiating out.
- Round 4 — lengthen each arm. In the top of each arm work ch 5, then 1 dc back into the third chain from the hook to create a small branch. Ch 2, then sl st into the next arm top. Repeat around all six arms, keeping every chain count identical so the flake stays symmetrical.
- Round 5 — the picot tips. At the end of each arm work ch 3, then sl st into the first of those 3 chains. That is one picot. Work three picots per arm: one centre tip and one on each side, separated by ch 2. This round is where the snowflake stops looking like a star and starts looking like frost.
- The hanging loop. On one arm only, after the centre picot, ch 12 and sl st back into the base of the same picot. This forms the ribbon loop. Keep it on the same arm so the flake hangs straight rather than tilted.
- Fasten off. Cut the thread leaving 6 in. Pull through the final loop. Weave the end along the back of an arm with a tapestry needle for at least 1 in, then snip. Do the same with the starting tail at the centre.
- Block it flat. Dampen the snowflake with water. Pin it out on a foam board or ironing board, stretching each arm to its full length and pinning each picot tip. Make sure opposite arms are the same length. Let it dry completely, which takes two to four hours.
- Stiffen it. Apply your chosen stiffener while the flake is still pinned, or dip and re-pin. See the comparison below. Let it cure fully before unpinning, usually overnight.
- Thread and hang. Run a thin silver ribbon, fishing line or baker's twine through the ch-12 loop. Your snowflake is finished and will hold its shape for many seasons if stored flat.
A snowflake that will not lie flat is almost never a tension problem. It is a blocking problem, and blocking is the easiest thing in crochet to fix.— Ava, MrsCrochetWorld
How to stiffen a crochet snowflake: three methods compared
An unstiffened thread snowflake is floppy and curls at the arms within a week. Stiffening is not optional for ornaments. Here are the three methods that actually work, with honest trade-offs.
| Method | Recipe | Hold | Watch out for |
|---|---|---|---|
| Sugar water | Equal parts sugar and water, heated until clear, cooled slightly | Very firm, glassy | Can attract insects in humid homes; not for outdoor use |
| Fabric stiffener | Commercial stiffener, used undiluted straight from the bottle | Firm and reliable | Costs more; apply in a ventilated room |
| White glue solution | Two parts white craft glue to one part water | Medium firm, slightly flexible | Can yellow slightly over several years |
Whichever you choose, the process is the same: saturate the snowflake, squeeze out the excess so it is damp rather than dripping, pin it out fully stretched on a covered foam board, and leave it until bone dry. Do not rush this with a hairdryer. Fast drying sets the thread unevenly and you get a warped flake.
Troubleshooting a snowflake that will not behave
- Arms curl upward. The outer round is too tight. Work round 5 with a hook one size larger, or simply block harder and pin every single tip.
- The centre bulges. Too many stitches in round 1, or your anchor stitches in round 3 are not spaced evenly. Recount: six arms means six anchors.
- It looks lopsided. Chain counts drifted. Snowflakes are unforgiving about this because the eye compares six identical arms. Count every chain out loud for one full flake.
- It is too small. Do not add rounds randomly. Switch to thicker thread and a bigger hook. Same pattern, bigger result, same proportions.
- Picots disappear into the lace. Your slip stitch back into the chain was worked too loosely. Snug it up and the bobble pops.
Twelve things to make with crochet snowflakes
One snowflake is a twenty-minute project. Six snowflakes become a real gift. These are the uses that sell best at winter craft markets and that people keep rather than put away.
- Tree ornaments. Three to four inches, stiffened hard, hung on silver thread. The classic and still the best seller.
- Window garland. Nine flakes in three sizes on a long length of fishing line, taped inside the glass.
- Gift-tag toppers. A two-inch flake glued to kraft card instantly upgrades plain brown wrapping paper.
- Napkin rings. Stitch a flake onto a simple chain ring for a winter table setting.
- Mobile for a nursery. Soft unstiffened DK flakes on an embroidery hoop, no small parts.
- Mug coasters. Size 3 cotton, unstiffened, worked slightly denser so it absorbs drips.
- Bookmark. One flake with a long chain tail and a small bead at the end.
- Advent countdown. Twenty-four tiny flakes, one pinned up each day of December.
- Hair clips. A small stiffened flake glued to a snap clip for winter photos.
- Wreath accents. Scatter twelve flakes across an evergreen wreath for a frosted effect.
- Jar lid covers. A flake tied over the lid of homemade jam makes a lovely handmade present.
- Card inserts. Stitch a flake directly onto a folded card through punched holes.
If you are planning to sell, remember that stiffened thread ornaments are light, flat and cheap to post, which makes them one of the most profitable small crochet items you can make. Price for the blocking and curing time, not just the crochet time.
Keep exploring

Five beginner holiday ornament patterns with step-by-step photos to hang beside your snowflakes.
View pattern →
Twenty festive flat motifs in cotton thread and yarn, perfect practice for lace and chain spaces.
View pattern →
Our full festive roundup: ornaments, plushies and gift ideas you can finish before December.
Read the guide →Works in any thread
The same five rounds scale from a two-inch gift tag to a six-inch window hanger. Change the thread, not the pattern.
Only four stitches
Chain, single crochet, double crochet and treble crochet. If you can work a flat circle, you can work this.
Twenty minutes each
Fast enough to batch for gifts, small enough to keep in your bag as a portable winter project.
Frequently asked questions
How long does it take to crochet one snowflake?
About twenty to thirty minutes for a three-inch snowflake in size 10 cotton thread once you have made one or two and know the rhythm. Your very first attempt will probably take an hour because you are reading each round carefully. Blocking and stiffening add drying time, usually overnight, but that is unattended time rather than work.
What yarn or thread is best for crochet snowflakes?
Size 10 cotton crochet thread with a 1.75 mm to 2.00 mm steel hook is the classic choice and gives a crisp three-inch ornament. If you are a complete beginner, start with size 3 thread and a 2.75 mm hook so the stitches are easier to see. Avoid acrylic yarn for ornaments because it does not hold a stiffened shape as well as cotton.
Why does my crochet snowflake curl up instead of lying flat?
Almost always because the outer round is worked tighter than the inner rounds, which pulls the edges in. Two fixes: work the final round with a hook one size larger, and block the finished flake properly by pinning every single arm tip while damp. Blocking solves the large majority of curling complaints.
How do I stiffen a crochet snowflake?
Saturate it in one of three solutions: equal parts sugar and water heated until clear, undiluted commercial fabric stiffener, or two parts white craft glue to one part water. Squeeze out the excess, pin the flake out fully stretched on a covered foam board, and let it dry completely before unpinning, which usually means overnight.
Can I use sugar water to stiffen snowflakes safely?
Yes, and it gives the firmest, glassiest finish of the three methods. The one caveat is humidity: in a damp home sugar can soften again or attract insects over a long storage period. If you store your ornaments in a dry sealed box it is not a problem, but for long-term heirloom pieces commercial stiffener is the safer choice.
How big should a crochet snowflake ornament be?
Three to four inches across is the sweet spot for a Christmas tree ornament. It reads clearly from a distance without overwhelming the branch. Go down to two inches for gift tags and earrings, and up to five or six inches for window hangers and wreath accents where you want the lace pattern to be visible.
What does picot mean in a snowflake pattern?
A picot is a tiny decorative bobble point. You chain three, then slip stitch back into the first of those three chains, which pulls the chains into a small raised nub. In snowflake patterns picots form the crystalline tips at the end of each arm, and they are the single detail that makes the piece read as frost rather than as a plain star.
Why does my snowflake look lopsided?
Your chain counts drifted somewhere in the outer rounds. Snowflakes are unusually unforgiving about this because the eye directly compares six supposedly identical arms, so a one-chain error is visible. Count every chain out loud for one complete flake and the symmetry problem disappears. A stitch marker in the first stitch of each round also helps.
Can beginners crochet snowflakes?
Yes. A snowflake uses only chain, single crochet, double crochet, treble crochet and slip stitch, all of which are beginner stitches. The only genuinely new skills are working into chain spaces and making a picot, and both take about five minutes to learn. The small size is also an advantage: a mistake costs you twenty minutes, not twenty hours.
How do I make a snowflake bigger without redesigning the pattern?
Change the material rather than the pattern. The same five rounds worked in size 3 thread with a 2.75 mm hook produce a flake roughly forty percent larger than size 10 thread, with identical proportions. Adding extra rounds instead tends to break the six-point symmetry unless the pattern was designed for it.
Do I need to block crochet snowflakes?
Yes, blocking is not optional for lace. Straight off the hook a snowflake looks small, bunched and shapeless because the chain spaces have not been opened out. Dampening it and pinning each arm to full extension is what reveals the design. Many makers who think their pattern failed simply have not blocked yet.
What can I do with finished crochet snowflakes?
Tree ornaments and window garlands are the two most popular uses. Beyond that they work beautifully as gift-tag toppers on kraft paper, napkin rings, bookmarks, jar lid covers for homemade preserves, hair clips, wreath accents and advent countdowns. Because they are flat and light they are also one of the cheapest handmade items to post to customers.
Make a whole set this winter
Pair your snowflakes with beginner-friendly MCW holiday patterns and have your tree finished before December.
Get the ornament bundle Get a free pattern