How to Stuff Amigurumi: No Lumps, No Gaps, No Show-Through
The finishing step that decides whether your plushie looks handmade or homemade — and the exact technique to get a smooth, firm, perfectly shaped toy every single time.

You spent eleven hours on that bear. The stitches are even, the colour changes are invisible, the face is adorable. Then you stuff it, close the seam, and it looks like a potato. Lumpy in the belly, flat on one side, and you can see white fluff glowing through the stitches like a nightlight. Nothing about your crochet was wrong. Your stuffing technique was.
Stuffing is the least documented step in almost every amigurumi pattern. Designers write out every increase and decrease in exhaustive detail, then say “stuff firmly” and move on. That single instruction hides at least six separate decisions: which filling material, how much, in what size pieces, in what order, how firm is firm, and how to stop the white from showing through a dark or loosely worked fabric.
This guide answers all six. It covers the physics of why lumps form in the first place, the pinch-and-pack method that professional toy makers use, how to handle tiny limbs that are too narrow for your fingers, how to stuff heads so the face stays symmetrical, and how to fix a toy you have already closed up. By the end you will be able to look at any finished amigurumi and know exactly how it was filled.
The three failures that ruin a finished plushie
Almost every stuffing problem is one of these three. Learn to recognise them and the fix becomes obvious.

The collapsed, wrinkled look
Both heads in this photograph were crocheted from the same pattern, the same yarn, and the same hook. The only difference is the filling. The left one is under-stuffed: the fabric has nothing to push against, so it folds inward, the surface wrinkles, and the face loses its roundness. The eyes sit on a dented plane instead of a curved one, which is why under-stuffed amigurumi always looks slightly sad.
Under-stuffing is by far the most common beginner mistake, and the reason is psychological rather than technical. Stuffing feels wrong while you are doing it. The piece looks alarmingly overfilled right up until the moment you close it, and then it settles into exactly the right shape. New makers stop too early because they are afraid of bursting the seams. Keep going.
Browse amigurumi patterns →
Visible bumps under the fabric
Lumps are not caused by too much stuffing. They are caused by stuffing that arrives in pieces too large to redistribute. Polyester fiberfill comes compressed in the bag, and a clump pulled straight out keeps its compressed shape. Once that dense knot is inside a closed crochet shell you cannot break it up, so it sits there as a permanent bump with soft hollow space around it.
The fix is upstream of the toy entirely: never put a clump inside. Tease every piece open first, and add it in portions roughly the size of a walnut for a mid-sized body, smaller for limbs. Narrow tubes like the arm shown here need a tool. A wooden stuffing stick, the blunt end of a chopstick, or the handle of your crochet hook lets you place a small pinch exactly at the far end and pack it before the next one goes in.
Beginner-friendly patterns →
White fluff glowing through the stitches
Show-through happens when white filling sits directly behind a fabric that is either dark, thin, or worked at a loose gauge. It is most obvious on black, navy, red and deep green, and it is the single fastest way to make a handmade toy look cheap. Stretching the fabric makes it worse, so an over-stuffed dark piece shows through more than a moderately stuffed one.
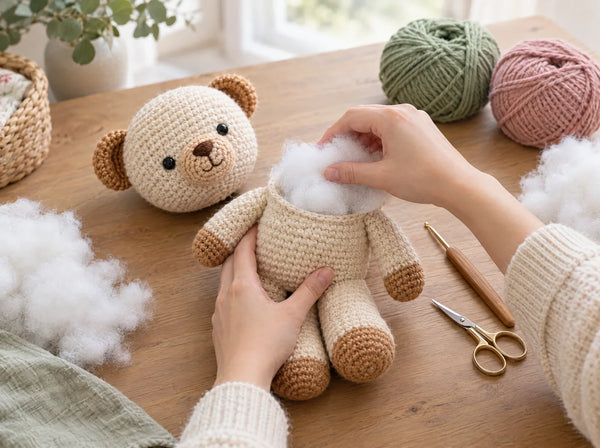
There are three reliable solutions. Use a filling that matches or is darker than the yarn. Line the inside of the piece with a scrap of matching felt or a square of matching fabric before filling. Or go down a hook size so the stitches sit tighter and leave no gaps for light to pass through. Preparing your fiberfill properly, as shown here, also helps, because evenly distributed fibres scatter light far less than a dense white knot pressed against the fabric.
Try a free pattern →The pinch-and-pack method, step by step
This is the core technique. It works for every shape, from a two-centimetre keychain charm to a full-size stuffed animal, and it is the method that separates toys that hold their shape for years from toys that go saggy after a month.
- Prepare the filling first. Pull a handful of fiberfill from the bag and tease it apart between your fingers until it is light and airy, roughly three times its compressed volume. Do this for all of it before you start, so you are not interrupting the stuffing rhythm to fluff more.
- Work from the furthest point inward. Fill the nose, the toe, the ear tip, the very end of the tail first. These extremities define the silhouette, and once the middle of a piece is packed you can no longer reach past it to reach them.
- Add small pinches, not handfuls. A piece the size of a walnut for a body, a pea for a finger-width limb. Each pinch should be small enough that you can feel it settle into place rather than wedge.
- Firm each layer before the next. Press the new pinch into the existing filling with a fingertip or the blunt end of a stuffing tool. You are compressing it against what is already there, which is what creates an even density instead of a layered one.
- Check the silhouette from the outside constantly. Hold the piece at arm's length every few pinches. Rotate it. Look for flat spots, dents and asymmetries while you can still fix them cheaply.
- Roll the piece between your palms. Every so often, roll the shape gently to redistribute fibres and smooth the surface. This single habit removes most minor lumps before they become permanent.
- Overfill slightly, then close. The piece should look about ten percent too full before you close the opening. Closing compresses it, and that final compression is what gives a professional firmness.
- Firm the closed piece one last time. After fastening off, squeeze and roll the finished piece in your hands for twenty seconds. It settles the filling into the corners and evens out the surface.
How much stuffing, by piece type
Firmness is not a single setting. A head that holds safety eyes needs to be harder than a floppy ear. Use this as a starting reference and adjust to the character of your pattern.
| Piece | Firmness | Why |
|---|---|---|
| Head | Very firm | Holds facial features in place and stops safety eyes from sinking or tilting over time. |
| Body / torso | Firm | Carries the weight of the limbs and keeps the toy sitting upright instead of slumping. |
| Arms and legs | Medium to firm | Firm enough to hold shape, soft enough to pose and to sew on flat against the body. |
| Muzzle / snout | Firm, small amount | Needs definition but will distort the face if over-filled. |
| Ears | Little or none | Usually worked flat; filling makes them stick out at an unnatural angle. |
| Tail | Light to medium | Depends on whether it should stand up or hang down. |
| Tiny charms under 4 cm | Firm, with a tool | Too narrow for fingers; pack in pea-sized pinches with a stick. |
Choosing a filling material
Polyester fiberfill is the default for good reason, but it is not the only option, and the alternatives matter for weighted toys, for babies, and for anything that will be washed.
Polyester fiberfill is springy, washable, hypoallergenic, inexpensive and widely available. It recovers its loft after compression, which is why a well-stuffed polyester toy still looks good after years of handling. Look for a fiberfill described as siliconised or premium: the fibres are coated so they slide past each other instead of clinging, which makes lumping far less likely. Cheap bonded fiberfill mats together and is the single most common cause of stubborn lumps.
Wool roving gives a denser, heavier, more sculptural result and is lovely for heirloom pieces, but it felts when washed and costs considerably more. Cotton stuffing is natural and breathable but compresses permanently and goes flat. Polypellets or glass beads in a sewn inner pouch add weight to a base so a toy sits upright; never add loose pellets to a toy for a child under three. Yarn scraps are tempting for stash-busting but produce a lumpy, heavy, uneven result and are best kept for pieces nobody will squeeze.
Small habits that make a visible difference
- Keep a dedicated stuffing tool next to your hooks. A wooden dowel sanded smooth at one end costs almost nothing and improves every limb you ever make.
- Stuff over a light-coloured cloth or tray. Loose fibres cling to everything, and a contained surface keeps your work area and your yarn clean.
- Wash and dry your hands before stuffing a pale toy. Fiberfill picks up oil and dirt from skin immediately and permanently.
- For dark yarns, buy a small bag of black or charcoal fiberfill and keep it separate. It costs very little and eliminates show-through entirely.
- Stuff the head before attaching it, never after. A head attached first cannot be filled properly through the neck opening.
- If the stitches start visibly spreading apart, stop. That is the real upper limit, and it is a gauge problem rather than a stuffing problem.
Stuffing heads so the face stays symmetrical
A head is the hardest piece to get right because the face is the thing everyone looks at, and because safety eyes are inserted before the head is closed. Fill the top of the head and the area immediately behind the eyes first, pressing firmly so the eye backings are supported and sit flush. If the area behind an eye is hollow, the eye will tilt inward over the following weeks and the toy will develop a permanent squint.
Work down and around the sides evenly, turning the piece constantly so you are never filling one side more than the other. Before closing, hold the head at eye level and look at it straight on. Asymmetry is far easier to see from the front than from above. If one cheek is fuller, open the fibres on the other side with a hook tip and add a small pinch rather than trying to push the existing filling across.
Firmness in a head should be noticeably higher than in the body. Press it with a thumb: it should give slightly and spring straight back without a dent remaining. If a dent stays, it needs more.
How to fix an amigurumi you have already closed
A finished toy is not a lost cause. For a toy that is simply too soft, find the seam, unpick two or three centimetres with a tapestry needle or a seam ripper, add filling with a stuffing stick through the small gap, and sew it closed again. The repair is invisible if you reuse the original yarn.
For a lump in a closed piece, try the massage approach first. Grip the toy on either side of the lump and work it firmly between your thumbs for a minute or two. Siliconised fiberfill often redistributes surprisingly well. If the lump persists, it is a bonded clump and will need to be removed through a reopened seam.
For show-through on a finished dark toy, the only real fix is to open it, remove the white filling, and refill with dark fiberfill. It is tedious, and it is the reason the five minutes of planning before you start is worth so much.
Stuffing is not the step after the crochet is finished. It is the step where the crochet becomes a toy.— Ava, MrsCrochetWorld
Keep exploring

Fifty beginner-friendly plushies worked in one piece, so there is far less sewing and far less to stuff badly.
View pattern →
Twenty soft, squeezable animals that are the perfect place to practise firm, even, lump-free filling.
View pattern →
The spiral seam explained, and how to stop your finished pieces from leaning to one side.
Read the guide →
Close the hole at the start of every amigurumi piece so no stuffing can ever escape through it.
Read the guide →Tension comes first
No stuffing technique can rescue a fabric with gaps in it. If light passes through your stitches before you fill the piece, tighten your gauge or drop a hook size before you reach for the fiberfill.
Safety for small children
For toys intended for babies and toddlers, use only washable polyester fiberfill, skip pellets and beads entirely, and embroider the facial features instead of using safety eyes.
Washing a stuffed toy
Hand wash in cool water, press out the excess without wringing, reshape while damp, and dry flat. Polyester fiberfill regains its loft; wool roving will felt and will not.
Frequently asked questions
How firm should amigurumi be stuffed?
Firmly enough that the piece holds its shape and springs back when you press it, but not so firmly that the stitches visibly spread apart and let light or filling through. Heads should be the firmest part of the toy because they support the facial features. Arms, legs and tails can be slightly softer so they remain poseable and sew on neatly.
Why does my amigurumi look lumpy after stuffing?
Lumps are almost always caused by adding fiberfill in large compressed clumps straight from the bag. Each clump keeps its dense shape inside the toy and cannot be broken up afterwards. Tease the filling apart until it is light and airy first, then add it in small pinches, pressing each one into the previous layer before adding the next.
What is the best stuffing for amigurumi?
Premium siliconised polyester fiberfill is the best all-round choice. It is springy, washable, hypoallergenic, inexpensive and it recovers its loft after being squashed. The siliconised coating lets the fibres slide past each other, which dramatically reduces lumping compared with cheap bonded fiberfill.
How do I stop white stuffing showing through dark yarn?
Use black or charcoal fiberfill behind dark yarn, line the inside of the piece with a scrap of matching felt or fabric before filling, or work at a tighter gauge with a smaller hook so there are no gaps between the stitches. Avoid over-stuffing dark pieces, because stretching the fabric opens the stitches and makes show-through worse.
How do I stuff very small amigurumi arms and legs?
Use a tool rather than your fingers. A smooth wooden stuffing stick, the blunt end of a chopstick, or the handle of a crochet hook lets you place pea-sized pinches at the far end of the tube and pack each one before the next goes in. Fill from the far end inward, never from the opening outward.
Can I use yarn scraps to stuff amigurumi?
You can, but the result is heavy, lumpy and uneven because yarn does not distribute or spring back the way fiberfill does. It is a reasonable way to use up scraps inside a decorative piece that nobody will squeeze, but it is not suitable for a toy that should look smooth or be handled regularly.
Should I stuff the head before or after attaching it?
Always stuff the head fully before attaching it to the body. Once the head is sewn on, the neck opening is too small to fill it properly, and you cannot reach the top of the head or press the filling in behind the eyes where it is needed most.
How much stuffing does one amigurumi use?
It varies enormously with size, but as a rough guide a small amigurumi of around 15 cm uses roughly 30 to 50 grams of fiberfill, while a 30 cm toy can use 150 grams or more. Buying a large bag is far more economical than small packets, and fiberfill keeps indefinitely.
Why do the eyes on my amigurumi tilt inward over time?
Because the area directly behind the safety eye backings was not filled firmly enough. The backing needs solid filling pressed against it to stay flush with the fabric. Fill the area behind the eyes first and press hard before filling the rest of the head.
Can I add more stuffing to a finished amigurumi?
Yes. Unpick two or three centimetres of the closing seam with a tapestry needle, add filling in small pinches with a stuffing stick, then sew the gap closed again using the original yarn. The repair is essentially invisible and is much faster than remaking the piece.
Should ears be stuffed?
Usually not. Most amigurumi ears are worked flat or only very lightly shaped, and adding filling makes them stand out at an unnatural angle and distorts the way they sit against the head. If a pattern specifically calls for shaped three-dimensional ears, use a very small amount.
Is it possible to over-stuff amigurumi?
Yes. The clear warning sign is the stitches spreading apart so that filling or light becomes visible through the fabric. At that point the toy looks strained, the surface distorts, and seams come under tension that can eventually break them. Stop at the point where the shape is full and firm but the stitch pattern still looks closed.
Put it into practice
Pick a pattern, stuff it properly, and see the difference the technique makes on a finished piece.
Shop amigurumi patterns Get a free pattern