Crochet Dog Pattern: Easy No-Sew Amigurumi Puppy Guide for Beginners (2026)
A complete, genuinely beginner-friendly crochet dog pattern with a free written pattern, no-sew construction, and every tricky step explained — from the first magic ring to the finished floppy-eared puppy.

A crochet dog is one of the best first amigurumi projects you can choose. It is built almost entirely from spheres and simple shaping, it forgives uneven tension, and the result looks unmistakably like a puppy even on your very first attempt. This guide gives you the complete free pattern, the material list that actually matters, and honest answers to the problems that trip up most beginners.
I have taught this exact puppy to hundreds of first-time crocheters through the MrsCrochetWorld pattern library, and the same four questions come up every single time: which yarn, what hook, how do I avoid holes, and how do I attach the head without it flopping over. Those questions shape this entire article. By the end you will have a finished dog and — more usefully — the technique base that every other amigurumi animal is built on.
What this guide covers
What you need before you start
Amigurumi is unusual among crochet disciplines because the material list genuinely changes the outcome. A blanket made with the wrong yarn is still a blanket. A crochet dog made with the wrong yarn is a lumpy bag with visible stuffing. Three decisions carry almost all the weight.
Yarn: cotton or a tightly spun acrylic
Use a worsted weight (category 4) or DK weight (category 3) yarn with a smooth, tight twist. Cotton is the classic amigurumi choice because it holds stitch definition, resists stretching, and does not fuzz over the small details. A dense acrylic works well too and is softer for a child's toy. What you should avoid on a first dog: mohair, chenille, boucle, faux fur, and anything with a halo. Those yarns hide your stitches entirely, which means you cannot see your mistakes and cannot count your rounds.
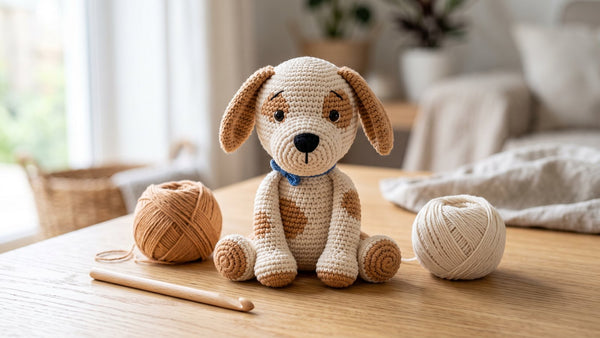
For the puppy in this guide I used cream for the head, body, and tail, with caramel for the ears, muzzle, and paw tips. Two colours is plenty. You will need roughly 90–120 g of the main colour and about 30 g of the contrast colour for a finished dog around 18 cm (7 in) tall.
Hook: go smaller than the label says
This is the single most important material decision and the one beginners get wrong most often. Your yarn label will suggest a hook — for worsted weight that is usually 5.0 mm or 5.5 mm. For amigurumi you go down one to two full sizes, to a 3.5 mm or 4.0 mm hook. The tighter fabric this creates is the entire point: it stops polyester fibrefill from pushing out between your stitches. If you can see stuffing through your work, your hook is too big. Nothing else will fix it.
Everything else
- Polyester fibrefill — roughly 60–80 g. Toy-grade, washable.
- Safety eyes, 9 mm or 10 mm. Skip these and embroider instead for any child under three.
- Stitch marker — a locking marker or a contrasting scrap of yarn. Non-negotiable, as you will see in the next section.
- Yarn needle — blunt tip, large eye, for the small amount of finishing this pattern still needs.
- Black embroidery floss or a scrap of dark yarn for the nose and mouth.
A note on "no-sew". No-sew amigurumi means the major body parts are crocheted directly onto one another instead of being made separately and stitched together. In this dog, the head and body are worked as one continuous piece, and the ears are attached with a crochet join. You will still use a needle for the nose and for weaving in ends — no pattern eliminates that. Anyone promising literally zero needlework is overselling.

Working in continuous rounds
Almost every amigurumi is worked in a spiral rather than in joined rounds. You never chain up, you never slip stitch to close, you simply keep going around and around. The advantage is that there is no visible seam line running up the side of your puppy's head. The disadvantage is that there is no obvious marker telling you where a round begins.
This is why the stitch marker matters more than any other tool in the list. Place it in the first stitch of every round and move it up as you come back around. Without it you will lose your place, your increases will drift out of alignment, and your sphere will develop a lopsided bulge that no amount of stuffing can correct.
Start with a magic ring rather than a chain-2 circle. A magic ring pulls completely closed, which means no hole at the tip of the muzzle or the top of the head — the detail that separates a tidy amigurumi from an obviously handmade first attempt.

How to Crochet a Magic Ring — Step by Step
Every piece in this dog pattern starts with a magic ring. If yours keeps loosening or leaves a hole, this walkthrough fixes it.
Read the tutorial →
Best Yarn for Amigurumi: The Complete Guide
Cotton, acrylic, blends and weights compared — with the specific brands that hold stitch definition on small plushies.
Compare the options →The free crochet dog pattern
Written in US crochet terms. Work in continuous spiral rounds unless told otherwise. The number in brackets at the end of each round is your total stitch count for that round — check it every time.
Abbreviations: MR = magic ring · sc = single crochet · inc = 2 sc in the same stitch · dec = invisible decrease · st(s) = stitch(es) · sl st = slip stitch · ch = chain · [ ] = repeat the contents to the end of the round · FO = fasten off
Head and body (one continuous piece, cream)
- 6 sc in MR. [6]
- inc ×6. [12]
- [sc, inc] ×6. [18]
- [2 sc, inc] ×6. [24]
- [3 sc, inc] ×6. [30]
- [4 sc, inc] ×6. [36]
- [5 sc, inc] ×6. [42]
- Rounds 8–15: sc in every st. [42]
- Round 16: insert safety eyes between rounds 11 and 12, about 7 stitches apart. Do this now — once the head is stuffed you cannot reach the backs of the posts.
- Round 16: [5 sc, dec] ×6. [36]
- Round 17: [4 sc, dec] ×6. [30]
- Round 18: [3 sc, dec] ×6. [24]
- Round 19: [2 sc, dec] ×6. [18]
- Stuff the head firmly now. Keep going with the same yarn — do not fasten off.
- Round 20: [sc, dec] ×6. [12]
- Round 21: sc in every st. [12] — this round forms the neck.
- Round 22: [sc, inc] ×6. [18]
- Round 23: [2 sc, inc] ×6. [24]
- Round 24: [3 sc, inc] ×6. [30]
- Round 25: [4 sc, inc] ×6. [36]
- Rounds 26–36: sc in every st. [36]
- Round 37: [4 sc, dec] ×6. [30]
- Round 38: [3 sc, dec] ×6. [24]
- Round 39: [2 sc, dec] ×6. [18]
- Stuff the body firmly, shaping as you go.
- Round 40: [sc, dec] ×6. [12]
- Round 41: dec ×6. [6]
- FO, leaving a short tail. Thread through the front loops of the final 6 stitches, pull closed, and weave the end inside.
Ears — make 2 (caramel)
- 6 sc in MR. [6]
- [sc, inc] ×3. [9]
- [2 sc, inc] ×3. [12]
- Rounds 4–9: sc in every st. [12]
- Flatten the ear and work 6 sc through both layers to close. Do not stuff — floppy ears need to stay flat.
- FO, leaving a 25 cm tail for attaching.
Muzzle (caramel)
- 6 sc in MR. [6]
- inc ×6. [12]
- [sc, inc] ×6. [18]
- Rounds 4–6: sc in every st. [18]
- FO, leaving a 30 cm tail. Stuff lightly — just enough to round it out.
Front legs — make 2 (cream, caramel tip)
- With caramel: 6 sc in MR. [6]
- inc ×6. [12]
- Rounds 3–4: sc in every st. [12]
- Switch to cream. Rounds 5–12: sc in every st. [12]
- Stuff the caramel paw firmly and the cream leg lightly.
- Flatten the open end and work 6 sc through both layers. FO with a 25 cm tail.
Back legs — make 2 (cream, caramel tip)
- With caramel: 6 sc in MR. [6]
- inc ×6. [12]
- [sc, inc] ×6. [18]
- Rounds 4–6: sc in every st. [18]
- Switch to cream. Rounds 7–9: sc in every st. [18]
- Round 10: [sc, dec] ×6. [12]
- Stuff firmly. Flatten and work 6 sc through both layers. FO with a 25 cm tail.
Tail (cream)
- 5 sc in MR. [5]
- Rounds 2–8: sc in every st. [5]
- Do not stuff. FO with a 20 cm tail.

Assembly and shaping
Because the head and body are one piece, assembly is far shorter than a traditional amigurumi. Lay out your pieces before you attach anything and check proportions against the photo — it is much easier to redo an ear now than after it is anchored.
Muzzle first. Pin or hold it centred just below the eyes, overlapping rounds 13 to 17 of the head. Attach with the long tail using a whipstitch through the outer loops, adding a little more stuffing just before you close the final few stitches.
Ears next. Position them on either side of the head around round 9, angled slightly forward so they fall naturally. Attach along the flattened top edge only — leaving the rest free is what makes them flop.
Legs last. Back legs sit at rounds 33 to 36, close enough to the base that the dog sits stably. Front legs attach at rounds 24 to 26, just below the neck. Sit the dog upright and adjust before you secure anything permanently. The tail goes at round 38, centre back.

How to Stuff Amigurumi: The Complete Guide
Firm, smooth and lump-free — how much fibrefill to use, when to add it, and why under-stuffing causes a floppy neck.
Get the technique →
Amigurumi Safety Eyes: Sizes, Placement & Attachment
Choosing 9 mm versus 10 mm, spacing them correctly, and the child-safe alternatives for toys under three.
See the guide →
The Invisible Decrease Explained
This pattern calls for invisible decreases throughout. Here is exactly how to work one and why it beats a standard sc2tog.
Learn the stitch →
Giving the puppy its face
The face is where a generic crochet sphere becomes a specific dog, and it is worth slowing down for. With the muzzle attached, use black embroidery floss to work a small satin-stitch triangle across the top centre of the muzzle for the nose. Keep the stitches close together and running in the same direction — that is what gives it a smooth, solid look rather than a scribbled one.
From the base of the nose, bring your needle straight down about four millimetres and take a single short vertical stitch, then add one shallow curve to each side for the mouth. Two small curves read as a friendly puppy; anything more elaborate tends to look strained.
Before you weave in the final end, hold the dog at arm's length. Faces that look fine at ten centimetres often look off at normal viewing distance. If something feels wrong, it is almost always eye spacing — one stitch too wide or too narrow changes the whole expression, and it is a five-minute fix now.
Five mistakes that ruin a crochet dog
| Problem | What causes it | The fix |
|---|---|---|
| Stuffing shows through the fabric | Hook too large for the yarn weight | Drop one to two hook sizes. A 3.5 mm hook with worsted yarn feels stiff at first and is correct. |
| Head flops forward | Neck rounds under-stuffed | Pack the neck (rounds 20–22) noticeably firmer than the rest. The neck carries the entire head. |
| Lopsided or egg-shaped head | Increases drifting because the round start was lost | Move your stitch marker every single round without exception. |
| Visible bumpy ridges at decreases | Standard sc2tog instead of invisible decrease | Work through front loops only of both stitches, then yarn over and pull through all loops. |
| Dog tips over when seated | Back legs placed too high on the body | Attach back legs at rounds 33–36 so they extend forward and create a stable base. |
How long should this take?
A confident beginner finishes this dog in four to six hours, usually across two or three sittings. If it is your first amigurumi ever, budget closer to eight hours and expect to restart the magic ring two or three times. That is normal and not a sign you have chosen the wrong project. The head and body piece is the longest stretch; every part after it goes quickly.
Sizing the pattern up or down
The pattern above produces a dog around 18 cm tall in worsted weight on a 3.5 mm hook. To make a keychain-sized puppy, switch to a 4 ply / sport weight yarn with a 2.5 mm hook and use the identical instructions — you will get roughly 11 cm. For a large cuddle toy, use chunky yarn with a 5 mm hook for about 30 cm. Never change the stitch counts to resize; change the yarn and hook and let the pattern do the work.
Want 50 more no-sew patterns like this one?
The MrsCrochetWorld No-Sew Bundle collects over 50 beginner-friendly amigurumi patterns in clear US terms — same step-by-step style, instant PDF download.
Browse the No-Sew BundleFrequently asked questions
Is a crochet dog a good project for a complete beginner?
Yes, and it is one of the better choices. The entire pattern uses only three techniques: the magic ring, single crochet, and increases and decreases. There is no colourwork beyond a simple yarn change, no complicated stitches, and no gauge swatch to match. What makes it beginner-appropriate is that the recognisable dog shape comes from the construction rather than from advanced skill — so even slightly uneven tension still produces something that clearly looks like a puppy.
What size crochet hook do I need for an amigurumi dog?
Use a 3.5 mm or 4.0 mm hook with worsted weight yarn. This is deliberately one to two sizes smaller than the yarn label recommends. The tighter fabric prevents stuffing from showing through the stitches, which is the most common flaw in beginner amigurumi. If you find the small hook uncomfortable, an ergonomic handle helps far more than sizing up.
How much yarn does this crochet dog use?
Roughly 90 to 120 grams of your main colour and about 30 grams of the contrast colour, for a finished dog around 18 cm tall in worsted weight cotton. One standard 100 g skein plus a small partial ball covers it comfortably. This makes the project an excellent way to use up leftovers from larger projects.
Why does my amigurumi dog have holes between the stitches?
Almost always the hook is too large. Amigurumi needs a dense fabric that fibrefill cannot escape through, which means going down from the recommended hook size. A secondary cause is loose tension — if you are already using a 3.5 mm hook and still seeing gaps, consciously tighten each loop as you pull it through. A third possibility is over-stuffing, which stretches the stitches open from the inside.
Can I make this crochet dog without any sewing at all?
Not entirely, and any pattern claiming otherwise is stretching the definition. This is a no-sew pattern in the meaningful sense: the head and body are crocheted as one continuous piece, which eliminates the hardest and most failure-prone seam in traditional amigurumi. You will still use a yarn needle to attach the ears, muzzle, legs and tail, and to embroider the nose. Expect around fifteen minutes of needlework instead of an hour and a half.
What is the best yarn for a crochet puppy?
A smooth, tightly spun cotton in worsted or DK weight gives the crispest stitch definition and holds its shape over years of handling. A dense acrylic is a good alternative when softness matters more, for example for a young child's toy. Avoid faux fur, chenille, mohair and boucle for this project — they obscure your stitches completely, which makes counting rounds nearly impossible and hides mistakes until the piece is finished.
How do I stop the head from flopping forward?
Stuff the neck rounds harder than feels natural. Rounds 20 to 22 form the narrowest part of the piece and carry the full weight of the head, so they need to be packed noticeably denser than the head or body. Add the stuffing in small pinches with the back end of a hook rather than in one large wad. If the head still tips after assembly, you can insert a short length of pipe cleaner folded into a loop through the neck as an internal support.
Are safety eyes safe for babies and toddlers?
Safety eyes are secure when correctly installed with their washers, but they are not recommended for children under three years old. The safe alternative is to embroider the eyes with black yarn or embroidery floss, which cannot detach under any circumstances. Embroidered eyes also suit this puppy's gentle expression well. If you are gifting to an infant, also choose a machine-washable acrylic and skip any other small attached parts.
How long does it take to crochet this dog?
Four to six hours for a confident beginner, typically spread over two or three sessions. A true first-timer should allow around eight hours, including time spent learning the magic ring. The head and body piece takes roughly half the total; ears, muzzle, legs and tail together take about an hour, and assembly plus the face takes thirty to forty minutes.
Can I sell finished dogs made from this pattern?
Yes. You may sell finished physical items you make from this free MrsCrochetWorld pattern at craft markets, in your own shop, or online. A credit linking back to MrsCrochetWorld is appreciated but not required. What you may not do is redistribute, republish, resell, or translate the written pattern itself, or present it as your own design. That applies to the text and photographs on this page as well.
How do I wash a finished crochet dog?
Hand wash in cool water with a mild detergent, pressing gently rather than wringing, then squeeze out excess water in a towel and air dry fully upright so the stuffing keeps its shape. Drying can take up to two days. Cotton amigurumi may shrink slightly and stiffen a little on the first wash, which usually softens again with handling. If the dog was made with acrylic yarn and embroidered eyes, a machine wash on a cold delicate cycle inside a mesh laundry bag is generally safe.
Can I use this pattern to make other animals?
Absolutely, and this is the real value of learning it. The head-and-body base is a universal amigurumi shape. Swap the floppy ears for small triangles and you have a cat; make them tall and rounded for a bear; lengthen the muzzle and add a pink nose for a fox. The stitch counts stay identical — only the appendages change. Once you have made this dog once, most beginner animal patterns will feel familiar.
This free pattern is provided for personal and small-business use. You may sell items you make from it. Please do not copy, redistribute or republish the written pattern or photographs. © MrsCrochetWorld 2026.