Stitch Markers for Amigurumi: The Simple Tool That Stops Lost Rounds
One tiny clip tells you exactly where the round starts, every single time — no more losing count halfway through a head.

You are twelve rounds into an amigurumi head, the phone rings, and when you sit back down you genuinely cannot tell where round twelve ended and round thirteen began. Every stitch looks the same. This is the single most common reason amigurumi projects get abandoned half-finished in a project bag, and a stitch marker fixes it completely.
Amigurumi is almost always worked in a continuous spiral, which means there is no slip stitch or chain to mark the end of a round the way rows do. Without a visual marker, the only way to know where you are is to count stitches from the very beginning every time you lose focus — which is exactly the moment you are least likely to want to do that. A stitch marker removes the guesswork, and it takes about two seconds to place.
This guide walks through exactly why spiral rounds are so easy to lose, how to place and move a marker correctly, which marker type suits which kind of project, and the calm recovery steps for the moment you inevitably drop one mid-round anyway. None of this requires special skill or an extra purchase — a scrap of contrasting yarn works just as well as a store-bought clip. What matters is building the habit of placing it and moving it, every single round, until it becomes as automatic as picking up your hook.
Why amigurumi rounds disappear so easily
Three small details make spiral amigurumi rounds harder to track than almost any other kind of crochet — understanding them is what makes the marker trick click.

There is no visible seam line
Rows worked back and forth have a clear turn at each end, so your eye naturally finds the edge. A spiral round has none of that — stitch sixty of round eleven sits directly beside stitch one of round twelve with zero visual difference. The marker is the only thing that tells those two stitches apart.
See a beginner-friendly pattern bundle →
The stitch count keeps changing
A round that starts at six stitches might grow to thirty before it decreases back down again for the head's final closing rounds. Every time the count changes, your "am I at the start yet" instinct resets. A marker does not care how many stitches are in the round — it just sits in the first one and waits for you.
Browse a simpler flat-shape bundle →
Single crochet looks identical from every angle
Amigurumi is worked almost entirely in single crochet in one color for most of a piece, so there is no texture change, no color change, and no stitch-pattern repeat to orient yourself by. Your eyes have nothing to grab onto except the tiny clip of color you placed there on purpose.
See a multi-piece dino bundle →How to place and move a stitch marker, step by step
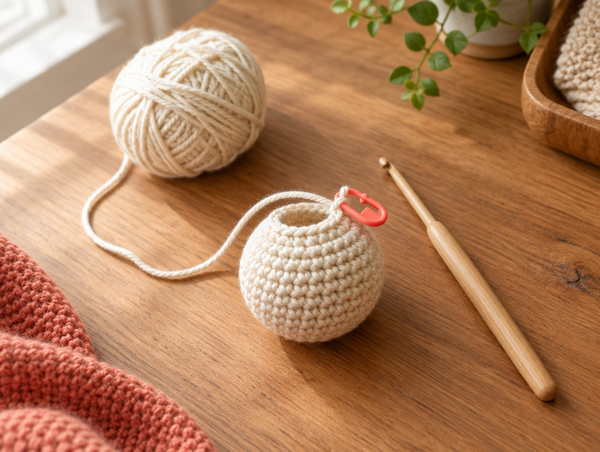
- Finish your magic ring and work the first stitch of round one. As soon as that first single crochet is on your hook, clip (or loop) your marker directly into the top of that stitch — the one you just made, not the one before it.
- Keep crocheting normally for the rest of the round. The marker just hangs there, out of the way. You do not need to touch it again until you reach it.
- When your hook comes back around to the stitch holding the marker, that is the end of the round. Work your next stitch into the following stitch as instructed by the pattern — this starts round two.
- Immediately remove the marker from the old stitch and clip it into the very first stitch of the new round. Do this before you forget which stitch was first; it takes two seconds and saves you from re-counting later.
- Repeat for every round until the piece is finished. On decrease rounds, place the marker in the first stitch exactly the same way — markers do not interact with increases or decreases at all, they only mark position.
- On the final closing round, you can remove the marker for good once you start fastening off, since there will not be another round to track.
| Marker type | Best for | Watch out for |
|---|---|---|
| Locking plastic clip | Most amigurumi, beginners, dense fabric | Can be hard to open with very cold hands; keep a spare, they occasionally snap |
| Open-ring stitch marker | Looser stitches, quick in-and-out placement | Can slip out of very tight single crochet if you are not careful |
| Contrasting yarn loop | Free, always available, safety-eye-friendly projects | Easy to crochet over by accident if you do not pull it clearly to the outside |
| Safety pin (closed) | Emergency substitute, already in your sewing kit | Larger and can distort small stitches; remove gently |
Four habits that make markers actually work
- Always place the marker in the stitch you just made, never in the stitch before it — this is the single most common placement mistake.
- Use a marker color that stands out clearly against your yarn. A cream marker on cream yarn defeats the entire point.
- Move the marker the instant you reach it, not "in a minute" — that is exactly when it gets forgotten.
- If you set a project down mid-round, also jot the round number on a sticky note. The marker tells you where the round starts; it does not tell you which round number you are on.
A stitch marker does not make you a better crocheter. It just stops you from having to be a human row counter on top of everything else.— Ava, MrsCrochetWorld
What to do when you lose the marker mid-round anyway
Everyone drops a marker eventually — it pops off, it gets tangled in yarn, or you simply forget to move it for two rounds. Here is the calm way back instead of frogging the whole piece.
- Stop at the end of your current stitch. Do not keep crocheting while you figure this out; every extra stitch makes recovery harder.
- Count stitches around your last known complete round using your pattern's stitch count for that round as a reference. If the number matches, you likely finished that round cleanly even without the marker.
- Place a new marker in the stitch you believe is the true start of the current round, based on that count, and keep going from there.
- If the count is off by one or two stitches, it is almost always faster to accept a tiny, invisible seam-line shift than to rip back several rounds of amigurumi stuffing and reshape.
- For future rounds, set a habit: move the marker the moment your hook reaches it, before you make the next stitch, so it never has the chance to sit forgotten.
A dropped marker feels like a bigger setback than it actually is. Most amigurumi fabric is forgiving enough that being off by a stitch or two on one round simply will not show once the piece is stuffed and seamed. Save the unraveling for situations where the stitch count is genuinely critical, like the final closing round of a head or a section with a visible color change pattern. For everything else, a quick recount and a fresh marker placement is faster, calmer, and just as reliable as starting over.
Keep exploring

A beginner-friendly bundle of simple spiral-round amigurumi to practice your marker habit on.
View pattern →
Nail the very first round of every amigurumi piece — right where your first stitch marker goes.
Read the guide →Works with any yarn weight
From fine sport-weight amigurumi to chunky plushies, a stitch marker clips into any stitch size without distorting it.
No special skill required
If you can clip a safety pin, you already know how to use a stitch marker. There is nothing to learn beyond placement.
Pairs well with round counting
Combine a marker with a simple tally or row counter app, and you will always know both where you are and how far you have come.
Once placing a marker becomes automatic, you will notice it changes how relaxing amigurumi feels overall. A huge amount of the mental fatigue in a long crochet session comes from quietly worrying that you have lost your place, even when you have not. Removing that one small uncertainty frees up attention for the parts of the craft that are actually enjoyable: watching a flat little disc of single crochet slowly curve into a recognizable head, choosing the next color, or simply letting your hands work while your mind wanders. It is a small tool with an outsized effect on how much you want to pick the project back up tomorrow.
Frequently asked questions
What is a stitch marker used for in amigurumi?
A stitch marker is a small clip or loop placed in the first stitch of a round so you can always find where that round began. Amigurumi is worked in a continuous spiral with no visible seam, so the marker is your only reliable way to tell one round from the next.
Do I really need a stitch marker for amigurumi?
You do not strictly need one, but without it you will frequently lose track of where a round starts, especially on pieces with many rounds like heads and bodies. A marker takes seconds to use and prevents the single most common reason amigurumi gets set aside unfinished.
Where exactly do I place the stitch marker?
Place it in the stitch you just completed — the very first stitch of the round, after it is already made. A common mistake is clipping it into the last stitch of the previous round instead, which is one stitch too early.
Do I move the marker every round?
Yes. The moment your hook reaches the stitch holding the marker, that round is complete. Remove the marker and immediately clip it into the first stitch of the brand-new round before you forget which one it was.
What can I use instead of a store-bought stitch marker?
A short loop of contrasting scrap yarn works just as well. Pull it through the stitch and leave a visible loop on the outside of the work so you can spot and remove it easily.
Can a safety pin work as a stitch marker?
A closed safety pin can work in a pinch, but it is bulkier than a dedicated locking marker and can stretch very small or tight stitches. It is a fine emergency substitute, not a long-term first choice.
Will a stitch marker leave a hole or mark in my amigurumi?
No. A properly sized locking marker or yarn loop sits in the stitch without pulling the fibers apart, and it is removed once you no longer need it. There is no permanent mark left behind.
What if my stitch marker falls off partway through a round?
Stop at your current stitch, count the stitches in that round against your pattern's stated count to confirm where the round likely started, then clip a new marker into that stitch and continue. Being off by one stitch is rarely worth ripping back for.
Do increase and decrease rounds need a different marker approach?
No. Markers only track position, not stitch count, so you place and move them in increase and decrease rounds exactly the same way as any other round — always in the first stitch worked.
Can I use more than one stitch marker at a time?
Yes. Many crocheters use one marker for the start of the round and a second, different-colored marker to flag a specific landmark, like where the next color change or ear placement needs to happen.
Does the color of the stitch marker matter?
It matters for visibility, not for the stitches themselves. Choose a marker that clearly contrasts with your yarn color so you can spot it at a glance instead of hunting for it among the stitches.
Is a stitch marker the same as a row counter?
No. A stitch marker shows you where the current round starts. A row or round counter is a separate tool or habit that tracks how many rounds you have completed overall. Using both together gives you the clearest picture of your progress.
Ready to crochet your next amigurumi without losing count?
Grab a beginner-friendly pattern bundle, clip in a stitch marker, and work your very first round the easy way.
Shop amigurumi patterns Get a free pattern