Crochet Cat Amigurumi Pattern: The Cutest Kitty Plush to Hook in 2026

A crochet cat amigurumi pattern is one of the sweetest, most rewarding projects you can pick up — soft paws, a tiny pink nose, and that little kitty face that melts hearts on every gift, nursery shelf, and Etsy shop. At MrsCrochetWorld, we have spent years designing kitty plushies that look adorable, hold their shape, and stay friendly for total beginners. This guide is your shortcut to making a crochet cat plush you will actually be proud of.
What's in this guide
- Why a crochet cat amigurumi is the perfect 2026 project
- What supplies do you need to crochet a cat plush?
- Which cat amigurumi pattern style is right for you?
- How do you crochet a cat amigurumi step by step?
- Featured pattern — the MrsCrochetWorld Maine Coon
- Common mistakes to avoid
- Pro tips for cute, professional-looking kitties
- Recommended cat & animal pattern books
- Frequently asked questions
- Final thoughts
Why a crochet cat amigurumi is the perfect 2026 project
Cats dominate cute culture — from viral kitten reels to the explosion of "slow-craft" hobbies on TikTok and Pinterest. A crochet cat plush sits right in the middle of every trend that matters this year: handmade gifts, mindful making, and small "comfort objects" people want on their desks or beds. MrsCrochetWorld is a US-English crochet pattern studio for amigurumi makers and Etsy sellers who want clean, tested designs with real beginner support.
Cat amigurumi also happens to be one of the friendliest entry points into the craft. Cats are round. They are forgiving. Wonky ears or a slightly tilted tail can read as character instead of a mistake. That is a luxury a giraffe or a dinosaur does not give you. Start here, build your confidence, and the rest of the animal kingdom becomes much easier to hook.
Who this guide is for
This pattern guide is written for confident beginners (you know single crochet, increase, decrease, and the magic ring) and intermediate makers who want a cleaner finish. If you have never crocheted before, start with our beginner crochet basics first, then come back — this article will still be here.
What supplies do you need to crochet a cat plush?
You do not need a fancy stash to make a stunning kitty. The right hook, a soft yarn, and a few finishing details do most of the work.
| Supply | Recommendation | Why it matters |
|---|---|---|
| Yarn | Worsted-weight (CYC 4) acrylic or cotton | Easy to find, gentle on hands, shows stitches clearly |
| Hook | 3.0 mm or 3.5 mm | Tight stitches so stuffing doesn't peek through |
| Stuffing | Polyester fiberfill | Lightweight, washable, holds shape |
| Eyes | 9–12 mm safety eyes (or embroidered) | Defines the kitty's personality |
| Yarn needle | Large-eye blunt | For sewing ears, tail, and limbs |
| Stitch markers | Lockable plastic | Keeps round counts honest |
| Optional | Embroidery floss, blush, ribbon | Adds nose, mouth, cheeks, bows |
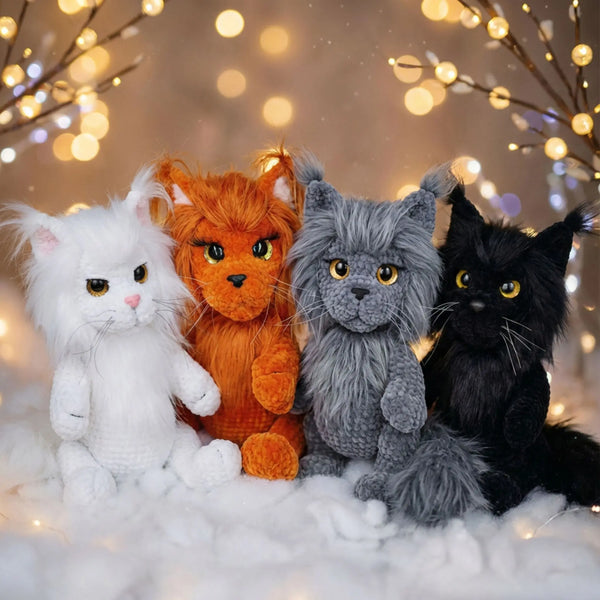
Color tip: A two-tone kitty (cream body + gray stripes, or white + black tuxedo) photographs beautifully on Etsy and Instagram. Pure white plushies are stunning but show every dirt mark — pick a soft cream instead.

Which cat amigurumi pattern style is right for you?
Not every kitty pattern is built the same. Picking the right style makes the difference between a finished plush you love and a half-done project hidden in a project bag.
1. Low-sew & no-sew cat patterns
The whole body is crocheted in one piece. You only sew tiny parts like ears or a tail (or nothing at all). Perfect if you hate sewing. Great for fast gifts.
2. Classic multi-piece amigurumi
Head, body, four legs, tail, and ears made separately and assembled. Takes longer but gives you the most realistic, posable kitty.
3. Lovey / snuggler cats
A cat head on a soft blanket body — the ultimate baby gift. Our Stitch & Angel Snuggler Lovey uses the exact same construction; swap the face and you have a kitty lovey in an afternoon.
4. Mini keychain cats
Tiny 2–3 inch kitties for keys, bag charms, or stocking stuffers. Great for using up scrap yarn and learning shaping in miniature.
| Style | Time | Skill | Best for |
|---|---|---|---|
| No-sew cat | 4–6 hours | Easy | Beginners, gifts, fast wins |
| Classic multi-piece | 8–12 hours | Intermediate | Realistic posable plush |
| Lovey cat | 3–5 hours | Easy | Baby showers, nursery gifts |
| Mini keychain | 1–2 hours | Easy | Scrap yarn, market stalls |
How do you crochet a cat amigurumi step by step?
Every cat amigurumi follows the same basic blueprint. Once you understand the order, every new pattern feels familiar.
Step 1 — Start the head with a magic ring
Cast on with a magic ring of 6 single crochet. Increase by 6 stitches every round until you reach the head's widest point (usually round 6–8). The magic ring keeps the top of the head closed without an ugly hole.
Step 2 — Shape the face
Work a few even rounds at the widest point so the face has space for eyes and a muzzle. This is where character lives. Place safety eyes between rounds 9 and 11 for most beginner cat patterns.
Step 3 — Decrease and stuff
Decrease by 6 each round to close the head. Stuff firmly before the opening closes too tight — under-stuffed amigurumi looks tired and saggy.
Step 4 — Body, legs, tail, and ears
Continue down into the body in one piece (low-sew style) or crochet separate pieces. The classic cat shape uses a slightly oval body, four short legs, a curled tail, and triangular ears.
Step 5 — Assemble and embroider the face
Sew ears flat to the top of the head with a slight forward tilt. Embroider the nose with pink yarn or floss in a small triangle, add a tiny V mouth underneath, and use a touch of blush on the cheeks for that "I love this plush" reaction.
Featured pattern — the MrsCrochetWorld Maine Coon Cat
The Maine Coon Cat Crochet Pattern is our most-loved single kitty design. It uses worsted-weight yarn, a 3.0 mm hook, and finishes at around 8 inches tall — the perfect "hold-and-cuddle" size for a desk companion or a thoughtful gift.

What makes this kitty different:
- Fluffy tail technique — a quick brushing tutorial turns plain stitches into a real Maine-Coon-style plume.
- Sturdy ear placement diagram — no more lopsided ears.
- Color block charts — the included chart shows tabby, calico, tuxedo, and black-cat variations on the same base pattern.
- PDF in US English — clean abbreviations, photo support, instant download.
Common mistakes to avoid when crocheting a cat plush
- Hook too big. A 5 mm hook with worsted yarn leaves gaps. Stuffing peeks through. Go down to 3.0–3.5 mm.
- Under-stuffing the head. A soft, droopy head looks sad. Stuff until firm before closing.
- Misplaced eyes. Eyes too high = surprised. Too low = sleepy. Use the pattern's exact round and place them symmetrically two stitches apart on each side of center.
- Ears sewn flat. Pinch the base of each ear before sewing so it sits up like a real cat ear, not a flap.
- Wrong yarn weight. Mixing DK and worsted in the same plush creates inconsistent shaping.
- Skipping the magic ring. A chain-start leaves a hole at the top of the head you can never fully close.
- Embroidering the nose too big. Cat noses are small. Two short straight stitches in a tight triangle are enough.
- Forgetting stitch markers. One missed round breaks every round after.
Pro tips for cute, professional-looking kitties
These are the tiny details that separate a "homemade" amigurumi from one that looks like it came from a high-end Etsy shop.
- Brush the tail. A wire pet slicker brush + acrylic yarn = surprisingly realistic fur.
- Add a tiny blush. A swipe of regular face blush on the cheeks (a clean cotton bud) instantly boosts cuteness.
- Sew with the same yarn. Match the seam yarn to the surrounding color — never use contrasting thread for assembly.
- Photograph in natural light. If you sell on Etsy, a window-side shot beats every studio setup.
- Block lightly. A quick steam (not iron!) smooths out wonky stitches before gifting.
- Add a collar. A 2 mm satin ribbon with a tiny bell turns any kitty into a "premium" plush.
Recommended cat & animal pattern books
🧶 Patterns You'll Love Next
- Maine Coon Cat Crochet Pattern (PDF) — our headline single kitty pattern, beginner-friendly with photo support.
- Stitch & Angel Snuggler Lovey — perfect "cat-shaped" lovey construction for baby gifts.
- Tiny Crochet Friends Book (30 mini patterns) — includes mini kittens, ideal for scrap yarn and keychains.
- Zootopia Amigurumi Pattern Book — includes Judy and Nick-inspired characters with the same shaping techniques you'll use for cats.
- 50-in-1 No-Sew Amigurumi Bundle — if you fell in love with no-sew kitty construction, this bundle expands into 50 friends.
🐱 Ready to make your first kitty?
Get the full Maine Coon Cat Amigurumi PDF — instant download, US English, beginner-friendly, with photo tutorial.
Get the Pattern →Frequently Asked Questions about Crochet Cat Amigurumi Patterns
How long does it take to crochet a cat amigurumi?
Most beginner cat plushies take 6 to 10 hours total — about 4 hours for the head and body, the rest for ears, tail, and assembly. Mini keychain kitties take 1–2 hours.
What is the easiest crochet cat pattern for beginners?
A no-sew or low-sew cat pattern is easiest because you crochet the head and body in one piece. The MrsCrochetWorld Maine Coon is also beginner-friendly because it uses only single crochet, increases, and decreases.
What yarn should I use to crochet a cat plush?
Worsted-weight (CYC 4) acrylic or cotton yarn with a 3.0–3.5 mm hook works best. Acrylic is forgiving and washable; cotton gives sharper stitch definition for photos.
What size hook do I need for a cat amigurumi?
3.0 mm or 3.5 mm with worsted-weight yarn. A smaller hook than the yarn label recommends keeps stitches tight so stuffing doesn't show through.
Can I sell crochet cats made from MrsCrochetWorld patterns?
Yes — small-batch handmade sales (Etsy, markets, craft fairs) are allowed for the finished plush, with credit to MrsCrochetWorld as the pattern designer. The pattern PDF itself cannot be redistributed.
What stuffing is best for amigurumi cats?
Premium polyester fiberfill. It is lightweight, holds shape, and is washable. Avoid cotton balls or cut-up fabric — they lump and discolor over time.
Should I use safety eyes or embroidered eyes for my crochet cat?
Safety eyes (9–12 mm) give a polished, professional look for older kids and adults. For babies under 3, always embroider eyes with yarn or floss — safety eyes can become a choking hazard.
How do I make my crochet cat look more realistic?
Brush the tail with a slicker brush, stuff the muzzle separately, place eyes slightly closer together (about 4 stitches apart), and add a touch of blush on the cheeks. Small details transform the final look.
Why does my amigurumi cat's head look lumpy?
Usually under-stuffing or uneven stuffing. Pack fiberfill firmly in small handfuls and shape with your fingers as you go. Stuff before the head opening closes too tight to fit your fingers in.
Are MrsCrochetWorld cat patterns written in US or UK crochet terms?
All MrsCrochetWorld patterns — including the Maine Coon, Stitch & Angel Lovey, and Tiny Crochet Friends — are written in US English crochet terms (sc = single crochet, dc = double crochet, etc.).
Can I crochet a cat plush without sewing?
Yes — look for "no-sew" or "low-sew" cat patterns. The body and head are crocheted as a single continuous piece. Only the ears and sometimes the tail need attaching.
How big is a finished cat amigurumi from these patterns?
With worsted-weight yarn and a 3.0 mm hook, the Maine Coon finishes around 8 inches tall. Switch to DK yarn and a 2.5 mm hook for a 5–6 inch mini version, or use chunky yarn and a 4 mm hook for a 12-inch giant kitty.
Final thoughts
A crochet cat amigurumi pattern is hands-down one of the most rewarding projects you can hook in 2026 — beginner-friendly shapes, big emotional payoff, and a finished plush everyone loves. Use worsted yarn with a 3.0 mm hook, place your eyes before stuffing, stuff firmly, and finish with the little brushed-tail and blush tricks that turn a "nice" amigurumi into a showstopper. Start with the MrsCrochetWorld Maine Coon if you want one perfect kitty, or grab the Tiny Crochet Friends book if you want to make a whole keychain colony. Either way: pick your yarn, queue up something cozy, and let yourself enjoy the slowest, sweetest hobby on earth.